

by Doc – Owner, Founder, Got Surprisingly Good at Sniping Without a Reticule Thanks to This Game
Battlefront: Classic Collection drops tomorrow, and I’ve been grinding out the horribly laggy multiplayer Conquest maps quite a bit. Playing Battlefront with human opponents versus computer opponents is a big change of pace and strategy, and it makes the game vastly more interesting… and frustrating.
This is my personal opinion on the most powerful classes in Battlefront II and an analysis of each one’s strengths and weakness. Before we begin, one should also take note that the usefulness of a class often depends on the map – the Engineer class is great on Tantive IV, where all combat is close-quarters, but a map like Hoth will render the Engineer utter trash. One should also remember that this list is against human opponents and assuming that bonuses are not present, so everyone starts with default weapons.
This was written with Battlefront II 2005 as the source material, but BCC may be different. As of now it looks functionally identical.
The Best Class – Sniper
Snipers are universal among classes and each have the same weapon loadout. Their sniper rifle is capable of killing most opponents in two shots, but a headshot is nearly always a one-shot kill. The exceptions to this are Droideka (who have no head hitbox) and certain high-HP opponents with a defense boost active.
The sniper rifle does vary between game versions. In the PC version of Battlefront II, the sniper rifle gets 8 shots to a clip and has no reticule unless scoped. In the PS2 version, where aiming is much more difficult, the reticule is always accurate and the aim assist practically aims it for you but the gun is reduced to 5 shots to a clip. PS2 players can mash their aim assist buttons and trigger and will usually plow through opponents fairly easily.
On maps like Tantive IV, Sniper can still pull his own weight, but the Engineer class is often more successful due to the closer quarters. A sniper who always hits his headshots will perform at the same level as an engineer who hits headshots with a shotgun in close quarters.
Pros:
- Runs much faster
- Extremely powerful weapon when the user is an accurate shooter
- Auto Turret can be used to surprise enemies coming around a corner, or as backup when multiple opponents are close by
- Great way to counter Sniper
Cons:
- Tends to be overwhelmed by multiple opponents at close range
- Lowest HP in the game and will often die to a headshot from a regular rifle
- Doesn’t function that well at the front lines

#2 – Engineer
Engineers are universally the same among factions, and are a class clearly designed to be the support role. Engineers are armed with their shotgun, a fusion cutter to repair buildings, 5 double health-ammo packs and a few Detpacks. To boot, Engineers don’t trigger mines when walking over them. On paper, this looks like a class whose job is to focus on eliminating turrets and vehicles with his explosives and fusion cutter, and to whip out the shotgun when surprised by an opponent.
That’s not how Engineer is played. In multiplayer, Engineer is often played as the “tip of the spear” in combat situations. Engineer uses a technique called “Detpack throwing” which is exactly how it sounds – they can place their detpack pretty far in front of them to blow up the enemies on the front lines. Anyone on the front lines who doesn’t get wiped by the bomb will get wiped by a headshot with the shotgun. When Engineer takes damage, he can retreat behind his own lines and heal himself with his health-ammo packs. Ironically, the support class is the firepower class.
It’s important to note: Engineer sucks at medium and long range. Engineer crushes on Tantive IV, Polis Massa and so on, but performs poorly on a larger map like Mygeeto.
Pros:
- Shotgun is absurdly powerful at close range and when headshots connect
- Detpack throwing is one of the most powerful techniques on the front lines
- Can still maintain a push when not at the front thanks to health-ammo packs for teammates
Cons:
- Shotgun takes a long time to reload the clip, leaving him vulnerable
- Detpack animations are slow and require Engineer to have line-of-sight with his opponents
- Shotgun is less effective than a regular rifle at middle range, and worthless at long range
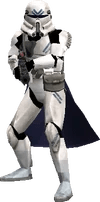
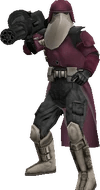
#3 – Magnaguard, Wookie Warrior, Imperial Officer
It’s hard to rank-order each of these classes individually, as they each have their own semi-unique loadouts and characters. I’m fudging it a bit by putting them all in the same bucket, but there’s good reason for that – their strengths are all pretty similar. Each class has a Recon Droid and a Mortar Launcher, the latter of which is pretty effective at moderate range. The Mortar Launcher is ideal for taking on a cluster of enemies, but it can also be used to clear mines and detpacks. That flexible offense-support role places the “class commander” role at 2.5.
MagnaGuard
Maggie’s Mortar Launcher is unique in that it doesn’t damage his droid teammates, so it can be used at close range without the punishing explosion damage. To make up for this, its blast radius is smaller than the other Mortar Launchers… but because it’s not an explosion, it can’t clear mines. Bummer.
Maggie’s also armed with the Bulldog RLR, which is… rather weird. It has a homing function that lets you hit enemies from a distance, but the projectiles don’t change their trajectory much to home to their target. The Bulldog is pretty helpful as “hallway spam” when there’s going to be enemies coming from one direction and one can reliably hit something no matter what side of the hallway they’re on. The Bulldog also doesn’t change trajectory if it’s not homed, so it can be used to “snipe” buildings and turrets from a distance if desired.
Maggie also has a last-ditch attack that he can deploy right before death – his Neurotoxin. If a Magnaguard is in close range of biological opponents, he can deploy Neurotoxin to cause them all to die from poisoning over the next 15 seconds. This is useful in crowded multiplayer matches when you know you’re going to die but can at least make a dent in the opponent.
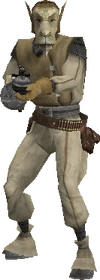
Wookie Warrior
The Wookie Warrior is the most flexible of the three, and probably the best. While he’s really slow and will take some time to get to the front lines, the Wookie doesn’t always need to. His Bowcaster can charge up and scope in to function as a sniper rifle, or it can stay unscoped and uncharged to serve as a wide-spread shotgun. The Bowcaster’s shotgun spreads are all at the same height, so each enemy will likely only be hit by one projectile unless they’re at point-blank range. If enemies are close enough to necessitate the Bowcaster’s shotgun, I recommend switching to the Mortar Launcher.
The Wookie Warrior’s real strength is that he’s simply a walking tank with the most HP of any unit in the game. Everyone will be shooting at the Wookie when he’s on the field, leaving his teammates free to pick off opponents while he absorbs damage. The Wookie will die in a few seconds, but those few seconds are often sufficient to let your team do their thing.
The Wookie Warrior is a pretty solid pick for any kind of map thanks to his sniper and shotgun functionality.
Imperial Officer
The Imperial Officer is subpar at best, and generally not a useful pick unless the Mortar Launcher is required or teammates need an attack boost. His main weapon, the Sonic Pistol, is rarely useful even when hitting headshots due to the slowness of its projectile (who would have thought that sound would be the slowest projectile attack?). It leaves him vulnerable and really shouldn’t be used in most cases.
His redeeming features are the Mortar Launcher and Rage. An Officer behind the front lines can run up, drop a Rage for a successful push, and then retreat to siege the front lines from a distance with Mortar Launcher.
#4 – Heavy Troopers
Heavy Troopers are pretty universal among factions, with each one having the same basic idea: they have a Rocket Launcher, a pistol, a few mines and 2 grenades. Heavies are designed as the ultimate anti-everything class, with a Rocket Launcher that can kill most classes and buildings in one hit (Droideka shields being the exception). They’re also the only convenient way to deal with tanks on the map unless one is willing to try slicing into the tank. Don’t try slicing into the tank.
Heavies’ greatest asset is actually their mines. Most multiplayer games see a few volunteers who pepper their command posts with mines to prevent capture. These mines prevent a sneaky player from coming in through the back of the lines and capping.
Some heavies use mines to push the front lines forward, going so far as to go to the heat of the action and drop a mine at a crucial area. This challenges the position of the opposing team – if they want that chokepoint back, they have to either throw a body on it or try to take it down with an explosive themselves. But if they do either, the heavy can simply come back out and plop down another mine. Engineers are often the only solution to this with their ability to avoid setting off mines and detpack throw.
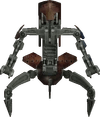
#5 – Droideka
The Droideka is one of the most unique classes in really any shooter game. The playstyle of the Droideka is unusual in that it has two modes: Walk and Ball. In Ball mode, it moves very fast and even has some jump functionality. It can sprint and cover a large portion of the map very quickly… but all it can do is move.
When Droideka decides it’s time to get some kills, it has to stop moving completely, enter the lengthy Walk mode setup animation where it uncurls itself and then put up its shield. This equates to about 3-4 seconds of complete vulnerability. In that time everyone will be shooting at the Droideka. They’ll probably also be shooting at you in Ball mode, too. Honestly you might contribute the most to the team by just being a target for a few seconds to take pressure off your teammates.
All of this comes together to make a very high-risk high-reward playstyle for Droideka. If the Droideka survives long enough to Walk and put up its shield, it’ll probably get some kills and will definitely attract enough attention to itself that its teammates can clean up the area. The likelihood that that happens is pretty slim, especially since Ball Droideka has a very thin HP pool.
A few notes on the Droideka shield: First, if you’ve put your shield up but nothing has shot it yet, it will stay at full HP and stay up until something hits it. You can basically camp out as a Droideka with your shield up without issue until someone shoots at you. Second, your shield will regenerate when not being used, so if you’ve survived a battle and don’t see enemies around you can drop it to let it regen.
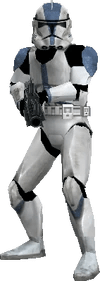
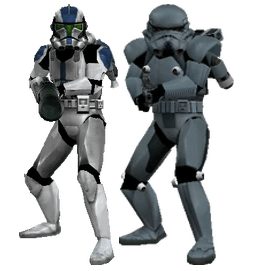
#6 – Soldier Unit (Except Super Battle Droid)
Soldier units (Clone Trooper, Stormtrooper, Rebel Soldier) are the generalist class and are universal among factions (though they have different ammo capacities). They all have 4 grenades, the basic rifle and the basic pistol. With the Elite Rifle and Precision Pistol they’d be a solid contender for the #1 spot as a single shot can kill nearly all units in the game. However, we’re assuming that there’s no bonuses – so they’re stuck at #6.
Most of the Soldier’s firepower actually comes from smart use of his grenades. A wise soldier can throw a grenade to force his opponent to reconsider their position. If the soldier puts the grenade within range of the opponent, it forces the opponent to roll away, leaving him vulnerable to be shot. If there’s walls nearby, the soldier can place the grenade such that the opponent has nowhere to run.
With focused practicing on grenade trajectories and an understanding of the aiming mechanics of the basic rifle, a Soldier unit can be a real asset to the team.
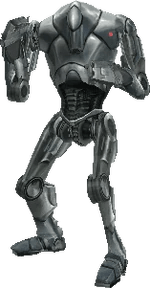
#7 – Super Battle Droid
The Supe is almost as good as a normal Soldier, but it’s lacking the strategic horsepower of a Thermal Detonator and trades it for a smaller head hitbox, Wrist Rockets (watch them) and the Tri-Shot. Wrist Rockets are small missile projectiles that can be used to target a slow-moving opponent like the Heavy Trooper or Clone Commander, but they can’t take on a crowd like the Thermal Detonator can. The Tri-Shot is an interesting alternative to the pistol, as it functions more like a shotgun that is really useless past point-blank range. The Tri-Shot’s shot pattern is like so:

As you might imagine, this is set up to perfectly miss the enemy’s head. The top two shots will go past the clone’s shoulders at nearly all distances, and only their feet will take damage. Thanks, CIS factories.
#8 – Jet Trooper/Dark Trooper
These two classes are wildly different in many ways, but their basic functionality is the same – surprise the opponent with an attack from an unexpected direction. They both have very thin HP pools equivalent to the sniper and are armed with a few grenades, their main weapon and the basic pistol.
The Jet Trooper’s jetpack gives him a lot of freedom and lets him gain height, fall, move forward and backward and otherwise have full range of motion for the duration of his fuel. He can fire shots from his EMP Launcher while airborne, which is effectively the Heavy Trooper’s Rocket Launcher but less powerful and with a 2-shot clip. The EMP Launcher is useful against Droideka units and Assault Droids, but has too small of a blast radius when colliding with a surface to be good at killing multiple opponents. It’s not great at taking on tanks.
The Dark Trooper’s jetpack blasts him horizontally forward, but minimizes the amount of time he spends in the air. The jetpack can be steered to a degree, but it’s best to line up your flight path before taking off. His Arc Caster is one of the most unique weapons in the game – if charged up and released on any unit (including friendlies), it can automatically “jump” the bolt from one unit to the other and kill them all. A full charge lets it jump to a total of 4 units, but the initial shot has to connect with an opponent to try the jump.
The Dark Trooper is held back by the fact that it can’t significantly charge the Arc Caster in-flight before either releasing it or getting shot out of the air. Most Dark Troopers will be best on the ground where they can take cover behind enemy lines, charge the Arc Caster and then pop out to take out a few opponents. Unfortunately they tend to die before that actually happens, due in no small part to their light HP and lengthy shooting animations.
#9 – Clone Commander
The Clone Commander is one of the best units in the game, and also one of the worst. The Commander is armed with a chaingun that must be warmed up for about a second before it can be fired, and a Rally that boosts the defense of any clones in his vicinity. He also carries a Recon Droid and the basic pistol, and boasts a larger HP pool than the norm.
With a squad of a few clones and a Rally, the commander is an absolute steamroller as he is uniquely equipped to handle groups of non-Droideka opponents at a time. The Commander’s chaingun only requires moderate precision on the part of the player to make consistent headshots, and consistent headshots let it rip through droids like nobody’s business. His clone subordinates can handle any Droideka that dares challenge the squad.
Without his clone teammates, the Commander is really vulnerable. His only immediate defense is the pistol, which won’t do the job against most opponents. If he can manage to survive for a second or two, he can warm up the chaingun to start ripping out HP – but headshots are much faster than that. He’s like the Droideka in that he’s designed to augment the capabilities of his teammates, not to serve as an individual unit on his own.
Basically the Clone Commander + Clones = best unit. Clone Commander without Clones = second-worst unit.
The Worst Unit – Bothan Spy
Some people really like the Bothan Spy. Those people are insane.
The Bothan Spy is the only stealth-based class in the game, with very little HP and no real stealth abilities. It’s technically armed with a cloak option (compare it to the Spy from Team Fortress 2), but that cloak option doesn’t render it completely invisible. Experienced players can spot a Bothan’s visibility distortion quite easily, and will cackle with joy as they shoot the Bothan who thought he was clever.
Bothans are also armed with Time Bombs, Regeneration and an Incinerator. The Bothan’s only real use is to drop Regeneration for his team and to try to sneak behind enemy lines to drop a Time Bomb. Unfortunately to accomplish any useful task he has to drop his cloak, effectively yelling “Hey! I’m a vulnerable target with no teammates nearby!”. Bothans do sometimes succeed in their intended playstyle of sneak-up-and-Incinerate-a-guy but it takes an entire Incinerator clip to kill one enemy and his teammates will likely notice that there’s a Bothan nearby.
He’s just bad, man.
