

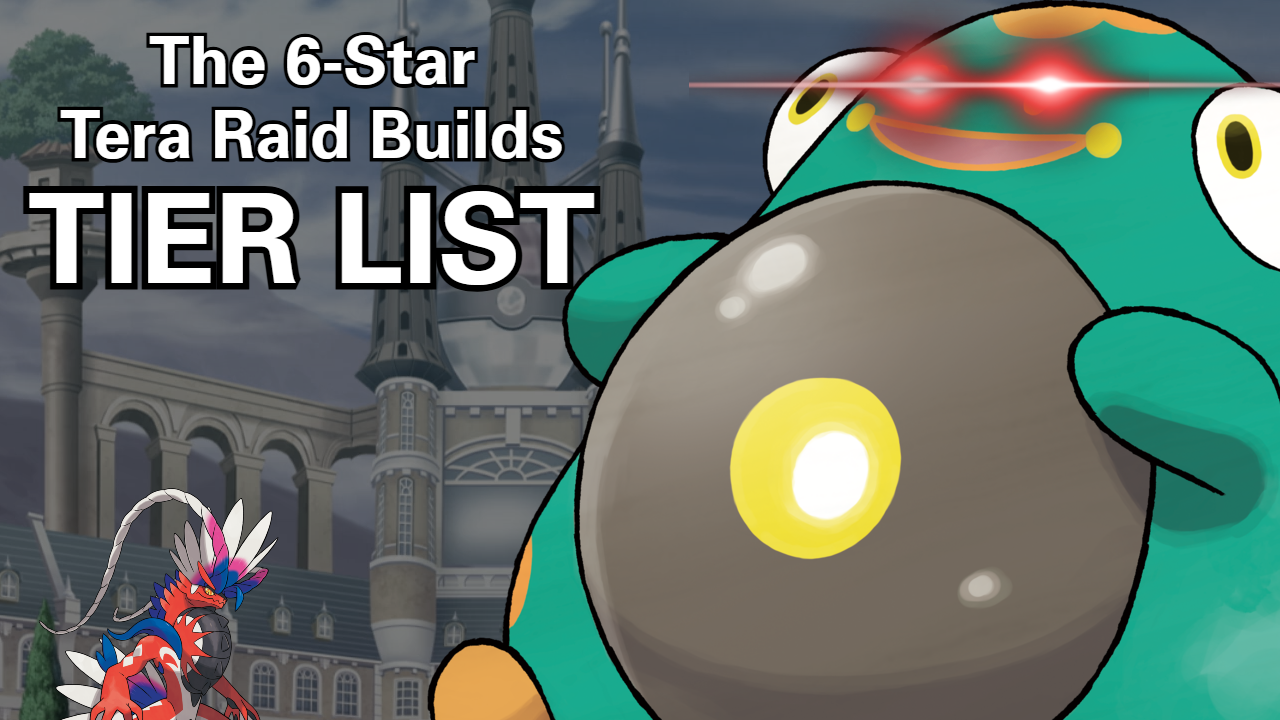
by Doc – Owner, Founder, Two and a Half Years Late to This List, But Two and a Half Years More Experience Than the Other Lists You’ll Find
Table of Contents (Click to drop down)
- Introduction
- What to Understand About 6-Star Raids (seriously, read this first):
- The Special Attacker Tera Raid Builds Tier List
- SS Tier – Special
- S Tier – Special
- A+ Tier – Special
- A Tier – Special
- B Tier – Special
- C+ Tier – Special
- C Tier – Special
- The Physical Attacker Tera Raid Builds Tier List
- S Tier – Physical
- A+ Tier – Physical
- A Tier – Physical
- B Tier – Physical
- C+ Tier – Physical
- C Tier – Physical
- Seviper
Introduction
Many of the “best” Tera Raider tier lists on the internet fall into one of three categories:
- Bad info
- Geared only towards 5-star raids, not 6-star
- Game8 (completely wrong, all the time)
I’m not kidding about Game8 having flatly wrong Tera raid builds and information on the internet: at the time of this writing (I won’t post the image for copyright reasons) their Koraidon build consists of Collision Course, Drain Punch, Screech and Fire Fang instead of Bulk Up or Swords Dance. Why would you ever need Fire Fang for a Fighting-type attacker? Utterly noobish.
I’ve taken it upon myself, having stopped counting the number of raids I won after 5,000 6-star Tera raids, the overwhelming majority of them having been offline and without assistance, to produce a tier list of the raid builds that I use on a regular basis, while isolating many of the trope builds like Body Press and Stored Power to their own placements. There’ll be significant overlap with the existing list of recommended Tera Raid builds, but you’ll notice that some builds on that list simply aren’t listed on the tier lists I’m about to present because that page exists more to teach you about raid strategies and mechanics outside the 6-star exclusive environment. Frankly I need to rework it from the ground up anyway.
What to Understand About 6-Star Raids (seriously, read this first):
- There are a near-infinite number of possible Tera Raid builds, so a complete tier list simply can’t exist.
- It doesn’t matter how good the build is, if you pick a Pokemon that’s getting whacked super effectively, you’re 10x more likely to lose. That ain’t the build’s fault.
- Tera Raids are unpredictable, RNG-heavy experiences and each raid and raid combination is unique. Sometimes you just get hit by two 10% freeze chances in a row and then a critical hit.
- We’re assuming you’re playing offline, using NPC teammates (online services won’t last forever). This a solo tier list.
- Your EV investments will almost always be 252 in Sp. Atk or Atk and the remainder put entirely Sp. Def or Def on the condition that if you’re running Bulk Up, Calm Mind, or some other move that raises a defensive stat, you invest in the stat not boosted. These moves will cover the other defensive stat for you. If you’re not running Bulk Up or Calm Mind, or other moves that raise a defensive stat, invest the remainder of your EVs into Sp. Def and Def equally.
- Your Tera Type will always be the type you plan to attack with. Everyone’s holding Shell Bell unless their primary attack is a lifesteal attack like Giga Drain/Drain Punch, in which case they’re usually holding Life Orb, and everyone’s 6IV/Hyper Trained at level 100 with the proper nature, no exceptions.
Please keep in mind the two tier lists are not ranked relative to each other, and the tiers are not ordered. The usefulness of a build depends on the opponent and their Tera typing, so relative rankings are about all we can do.
Because of the staggering number of possible Tera raiders available, I encourage you to generate your own Pokemon using third-party methods so as to not have to supply rare mythicals, legendaries etc. to try the builds. Tera Raid builds should be something that is accessible to everyone. Just don’t let the generated Pokemon leave your save file!
The Special Attacker Tera Raid Builds Tier List
See that “line of super effectiveness”? The tiers aren’t ordered within each other because the precise viability of each Pokemon depends on the individual raid and its type, but generally anything above that line doesn’t have to be super effective to consistently win*. Anything below that line reallllllly should be used only when it’s super effective. It’s not an exact system, just an estimation, but it does let you know how viable a build is when you’re identifying build options for whatever type you’re about to fight.
*we’re assuming you’re not picking a Pokemon that’s being hit super effectively, too
SS Tier – Special
Bellibolt
As I’ve made clear in the other, more detailed builds page, Bellibolt is without a doubt the best Pokémon Tera raider that I have yet to ever encounter. The reason for this isn’t that he is a faster killer or a great support – I placed him there because so long as you play him correctly and don’t use him against Ground and Steel types, he’ll win basically every time. I won’t rehash everything that went on in that post, but the idea for Bellibolt is pretty simple: Drop an Acid Spray. Now a Parabolic Charge. Do it again. Do it again. You’re good. So long as Bellibolt is not somehow in a situation where he is getting one-hit KO’d or one of the few weaknesses described below, you can beat the raid 99.9% of the time.
Bellibolt runs:
- Acid Spray
- Parabolic Charge
- Electric Terrain
- Optional move slot (explored in detail on the other page)
His one really unbeatable weakness is being hit with Ground-type attacks, which pose a problem to him. Otherwise every other conceivable weakness can be mitigated: inflicting sleep can be mitigated with Electric Terrain. Stat drops can be mitigated with his ability Electromorphosis and with the Metronome held item. The opponent raising their stats is harder but can be mitigated with screens. Steel-type Tera opponents are difficult because they’re immune to Acid Spray and resist Parabolic Charge, but Electric Terrain and Attack cheers help with that. Confusion… okay, confusion you’re stuck with. But basically he’s invincible when played correctly save for those one or two things, or just bad friggin’ luck.
S Tier – Special
Gholdengo
Gholdengo is extremely useful both as a Ghost and as a Steel type attacker, and the only change you need to switch from one to the other is changing his Tera type. Gholdengo runs:
- Make It Rain
- Shadow Ball
- Nasty Plot
- Metal Sound
But that’s not where his real abilities lie. His great moveset is combined with his ability Good as Gold, which renders him immune to other status moves. The only flaw on this ability is that on the turn that your stats are reset about halfway through the raid, your abilities are nullified. Otherwise, you can’t get status inflictions! And the ability kicks in on the very next turn, so if you find yourself with a status infliction, just use a Heal Cheer and it’ll go away.
Gholdengo is straightforward: raise your stats with Nasty Plot, lower the enemy stats with Metal Sound, and then hit them with Make It Rain or Shadow Ball. I keep mine on a default Ghost type because Shadow Ball is much more consistent, but either should be fine so long as Make It Rain users have enough Nasty Plots under their belt to balance out the Sp. Atk-lowering side effects. And as always, be aware of his type weaknesses and plan appropriately.
You might consider using Stellar Tera Type for Gholdengo, but you do miss out on the extra STAB if you run that. I encourage having two similar builds with different Teras if you can.
Miraidon
Miraidon is almost as flexible as Bellibolt – I have three Miraidon builds on this tier list for a reason – so I’ll rank each of them separately.
Parabolic Charge Option is just Bellibolt but Miraidon. You show up, drop an Electric Terrain if you want, drop a Calm Mind if you want (honestly, drop two), hold your Metronome, and release Parabolic Charge until the cows come home. This is the very reliable version of Miraidon. You’ll run:
- Calm Mind
- Parabolic Charge
- Metal Sound
- Electric Terrain
Electro Drift is the sexy version of this build. You’ll run:
- Calm Mind
- Electro Drift
- Metal Sound
- Electric Terrain
This is very similar to the build above. The only difference is that you’re trying to do more damage with fewer hits, which will self-heal you more (oh yeah – hold Shell Bell too), but you run low on PP much quicker, and are more reliant on your stats. Both Parabolic Charge and Electro Drift builds are S tier, and for good reason.
One Shot Build is really the same build as Electro Drift, but the way that you play it is different. You’ll see on the other Tera raid builds page that I link to periodically on this page that there are what I call “play it by ear” builds and “lock and load” builds. The “play it by ear” builds are ones where you make decisions in the moment, thinking one or two turns ahead, and they’re generally more successful as a result. “Lock and load” builds are ones where you go in, buff your own stats, debuff the enemy stats as much as you possibly can and then take your shot, hoping to knock out the entire opponent in one hit. Lock and load builds (also called one-hit KO builds) are typically not as successful in six-star raids. Frankly, I’m being a bit generous by putting it in A tier.
Arceus (Grass)
Arceus is arguably the best Grass type attacker for special attackers, due in no small part to the fact that Ogerpon is a physical attacker! While it would be really nice if we had a way to quickly self-heal with Arceus besides Shell Bell or Giga Drain, we unfortunately don’t have that. No, the move Recover doesn’t count – it takes an entire turn, and that is too costly for time.
To this end, Arceus really can only be Normal type holding Shell Bell, or Grass type holding anything he wants, and using Giga Drain. I’ve decided to give him the Meadow Plate so that his Grass type attacks are boosted, and that you get the Grass type same-type attack bonus, so he’s a great Grass type killer. Arceus is very tanky with very high Special Defense and Defense stats both, so you shouldn’t be worried about dying – you should be worried about doing enough damage in the meantime. To this end, he packs:
- Giga Drain
- Acid Spray
- Calm Mind
- Judgment (optional)
Acid Spray is the best offensive move in the game besides Parabolic Charge for the simple fact that, while it doesn’t do a lot of damage, it lowers the user’s Special Defense by two stages, effectively doubling your special damage output against them. So using one or two Acid Sprays, two Calm Minds and then starting with Giga Drain is an excellent start to any raid, because then you have your Tera orb charged and if you’ve survived this long, the healing from Giga Drain will be immense. However, don’t be afraid to prematurely use Giga Drain, because you’ll get a lot of HP from that as well. As Queen would say, “Keep yourself alive”.
Kyogre
Kyogre is an excellent Water type attacker, due to the simple fact that his stats are insane and compensate for his somewhat bad moves. He has a handful of options that I’ve gone into detail on the other page, so I will stick with this recommendation:
- Surf
- Water Spout
- Calm Mind
- Rain Dance
The strat is obvious: keep a Rain Dance up whenever possible to boost water moves unless the opponent spends a turn nullifying your weather. Drop one or two Calm Minds, or even three if you’re feeling it (three is pretty good actually) and then hit with Surf and Water Spout. Hit with Surf when you’re below about 2/3 HP, and hit with Water Spout when you’re above it.
Enamorus-Therian
Enamorus-Therian is annoying, but really good at survivability, which is hard to pull off for a Fairy type. Run:
- Moonblast
- Draining Kiss
- Calm Mind
- Misty Terrain
Fair note: Misty Terrain is optional, as it does nullify status effects but you don’t always need that due to her ability Overcoat. You’re basically making two decisions with this one: if you need to heal, use Draining Kiss. If you need to do damage, use Moonblast. Keep stocked up on Calm Minds and you’ll be fine. Bonus points for using it against Sleep.
Mew
Mew is a Pokémon that has a theoretically infinite number of builds, or might as well have that many. For purposes of this tier list, we will simply split them into Psychic type Mew and non-Psychic type Mew, as that is much simpler. Just know that he’s got a lotta options I’m not giving you here. (But I do go into detail about them here).
I’d be remiss if I didn’t state that there are tons of great Psychic type attackers due to the consistent presence of Nasty Plot and Psychic among the Psychic type legendaries. If you don’t have Mew, try Mewtwo. If you don’t have either… seriously, use Bulbapedia. You’ve got a Psychic type with Nasty Plot somewhere in there.
Psychic type Mew runs:
- Psychic
- Amnesia or Iron Defense
- Nasty Plot
- Acid Spray (Metal Sound if you’re needing to cover Steel)
His Special Attack stat is much lower than Enamorus and Kyogre by almost 100 at max level, and max IV training, but he has Nasty Plot, so it works out just fine. With all of this in place, he’s really quite a potent Psychic type attacker. He’s easily S tier.
Reflect-type Mew typically runs something like:
- Amnesia or Iron Defense
- Nasty Plot
- Acid Spray
- Whatever special attacking type move he’s going to run
You may also consider going for a Stellar Tera typing with non-Psychic type Mew, as that is the optimal typing for off-type attacks so long as you’re not wanting your defensive profile to change (if you do want your defensive profile to change, then just change your Tera to whatever you’re attacking with, though I don’t recommend doing that). I put this at top of A tier but that’s about as high as you’ll get out of Mew when he’s not running Psychic or something similar. Play it safe. Run Psychic Mew.
Calyrex-Shadow
Calyrex-Shadow is a useful alternative to Gholdengo when his Steel typing is getting in the way. The downside is Calyrex is triple weak to Ghost and Dark both. It’s a real downside, but if you’re not getting hit by those two types, then you’re pretty much fine. He’s a beast.
He runs:
- Astral Barrage
- Nasty Plot
- Shadow Ball
- Taunt
I would encourage you to start your raids by hitting a Taunt, and then hitting Shadow Ball to build up your Tera raid charge. This will give you an idea of whether Dark and Ghost type attacks are present or not, and if they are, you can just dip out of the raid (assuming you’re offline) and grab a different raider. Once you’ve built up your Tera charge, use it, buff yourself with a Nasty Plot and keep hitting Shadow Balls until the Tera shield goes up. Once the shield goes up, and your stats are wiped, drop another Nasty Plot or two if you can manage a second one, and then hit Astral Barrage. Odds are you will outspeed the opponent, so you don’t need to worry too much about self-healing so long as it’s above a moderate amount.
Dawn Wings Necrozma
Necrozma is the ingredient to great Ghost type or Psychic type attacks no matter which side you’re coming from. Merging him with Lunala results in Dawn Wings Necrozma, which can work either as a Psychic or a Ghost type. Either way, he will run this moveset:
- Calm Mind
- Psychic
- Iron Defense
- Photon Geyser (if you want Psychic type) or Moongeist Beam (if you want Ghost type)
These tiers are not ordered but if they were, Dawn Wings Necrozma would be near the top of S. Just remember – it takes two legendaries to produce this raider, and most of these moves have to be learned by Lunala or Solgaleo, not Necrozma.
Ho-Oh
Ho-Oh suffers from bad typing… which can be easily mitigated by simply not using him when he’s going to get hit super effectively. Ain’t it crazy how different Tera Raids are from regular Pokemon? Just remember that you lose your Ground immunity when Terastallizing.
Aside from his typing, Ho-Oh feels like some sort of flying fortress, with fantastic Sp. Def and acceptable Defense, in addition to the necessary tools to raise those defenses. Stick your EVs into Sp. Atk and Defense.
Ho-Oh runs:
- Flamethrower
- Calm Mind
- Sunny Day
- Reflect/Sacred Fire
Reflect or Sacred Fire is a real thinker of a tradeoff. Sacred Fire is physical attack, so it’s not boosted by Calm Mind nor is it 100% accurate. However, it has a 50/50 burn chance, which cuts the opponent’s Attack in half and it can give you a Tera Orb charge while healing some HP, so it’s particularly helpful in the early game. However, Reflect survives stat wipes and is guaranteed. Defensively, they’ll have basically the same effect. Sacred Fire’s the better move when it works, Reflect is the better move on average. Up to you.
Raging Bolt
Raging Bolt is a surprisingly tanky Electric-type attacker who operates as a great alternative to Bellibolt if you need a bit more survivability and a lot more power at the cost of some options. Raging Bolt runs:
- Calm Mind
- Rising Voltage
- Electric Terrain
- Sunny Day
The downside of Raging Bolt is that you have to set up with Electric Terrain no matter what. The upside is that synergizes tremendously well with Rising Voltage anyway, and on top of his maxed-out Sp. Atk of 410 you’ll be chugging along pretty well even if you’re not super effective. Do be careful: having Arboliva as a partner basically invalidates Raging Bolt completely, and some raids periodically set terrain as well. Raging Bolt can’t operate in those raids.
If you’re looking to set even more of the battlefield in your favor or play some weather wars, he does still have Protosynthesis, so Sunny Day lets him operate in that field. Between Electric Terrain killing Sleep and Sunny Day killing weather, he’s a pretty versatile Pokemon.
A+ Tier – Special
Lugia
Lugia is one of precious few options for Flying types. Lugia runs:
- Rain Dance
- Calm Mind
- Aeroblast
- Hurricane
This is an unusual strategy: You need to keep Rain Dance up so that your Hurricanes will always hit. To that end, Lugia relies on a factor not typically relied on in raids: the weather. If Rain Dance goes out and you don’t have the HP to survive the two hits that it would take to put up Rain Dance and land a Hurricane, you have Aeroblast at your disposal. It’s unlikely you’ll ever be in that situation, because Lugia is absurdly bulky.
Psychic type Lugia also exists. It’s honestly hot garbage, and if you have access to legendaries, get any of the other Psychic type legendaries that have Calm Mind or Nasty Plot and use them instead.
Vileplume
Vileplume is an interesting one: he can work either as a Grass type or a Poison type attacker, but the Grass type one is better because of Giga Drain just being an awesome move.
The Grass type version runs:
- Acid Spray
- Giga Drain
- Growth
- Grassy Terrain/Sunny Day
while holding Metronome. I also encourage the ability Effect Spore so that raiders that make contact with you may find themselves paralyzed even after their Tera shield is up. The Grass type strat is the same as Arceus: drop a Growth or two, and Acid Spray or two, and then whale away with Giga Drain.
The Poison type runs a similar moveset as well:
- Sludge Bomb
- Acid Spray
- Stun Spore/Sunny Day
- Growth
but holding Shell Bell, not Metronome. Acid Spray and Growth as needed, Stun Spore if you can get away with it, and then just Sludge Bomb. Vileplume is one of the only good Poison type attackers you’ll ever find, so be sure to use both builds. He’s available in the Indigo Disc DLC, not the base game, so if you don’t have the DLC you may need to import him from Pokémon Home or a previous Pokémon game.
For both of these, be aware that sun causes Growth to boost your Attack and Sp. Atk by +2 instead of +1, so while it costs you a turn to set it up you save the turn of running a second Growth. Highly worth considering Sunny Day regardless of which build you run.
Armarouge
Armarouge is A+ in the current iteration of the special tier list, whereas his cousin Ceruledge is A in the physical tier list, but I would still consider Ceruledge to be the better of the two – these tier lists are ranked relative to the other attackers of their type, and aren’t comparable to the other kind of attacking.
Armarouge runs:
- Calm Mind
- Mystical Fire
- Acid Spray
- Taunt
He also runs the Flash Fire ability, though that’s not often helpful. He’s very straightforward – Calm Mind, Acid Spray, Taunt if you need it, and then attack. He also has a Psychic type option and the ability to use Stored Power, but those are inferior enough that I wouldn’t consider it necessary to use those builds.
Deoxys
Deoxys only has one form viable for raids – Defense Form. The good news is that he will basically never die in this form, unless he’s getting hit super effectively and the opponent has been buffed. The bad news is you have to squeeze every bit of damage out of him that you can get. To that end, he runs this moveset:
- Nasty Plot
- Cosmic Power
- Expanding Force
- Psychic Terrain
This is an unusual moveset. Nasty Plot serves its typical purpose, and Cosmic Power basically makes you invulnerable after a single use because your stats are so high. The real issue is much like what Kyogre ran into: keeping the battlefield favorable to you. Expanding Force is a move that will only do a noticeable amount of damage if you have Psychic Terrain on the field. Psychic Terrain lasts for five turns because we’re holding Shell Bell, not Light Clay, so you’ve got to stay topped off on having at least two Nasty Plots and a Psychic Terrain up. However, if you can pull that off this Psychic attacker set will be one of the most effective in your arsenal. I would consider it roughly equivalent to Mew in general, save for the trade-off in having lower attack stats for significantly increased defense stats. Consider them each to be one half of a Psychic type pair.
Terapagos
Terapagos is one of the most unique builds that you will see in raids due in no small part to this Pokémon’s gimmick. Terapagos has absurdly good stats when Terastalized. To that end, your goal is to stay alive long enough and to Terastalize fast enough so that you can make Terastalization happen, and then start doing the big damage.
To that end, he runs this moveset:
- Tera Starstorm
- Calm Mind
- A third move option that attacks
- Substitute
The idea is straightforward: You are only weak to Fighting, so put up a Substitute on turn one, Calm Mind if you need it, hit them with three or four of the third move option that you chose, Terastalize, and then rain down Tera Starstorms as much as possible. Don’t use Starstorms until you have three Calm Minds under your belt. You only get 8 PP, so it’s a waste to do it with anything less than that.
I won’t lie: this build is slow, tricky and may feel like a waste of time. However, you may find that it’s more successful to maximize your Special Attack EV investment and your defensive investment to speed up the process without really sacrificing bulk. It is extremely important that you DO NOT DIE. These builds are generally designed so that you wouldn’t die anyway, but if you lose your Tera with this build then your raid is completely lost.
Your third move choice is also an important option. Personally, I use Earth Power because it’s his highest damage dealing special attack move with a base power of 90, and an accuracy of 100%, and it also is effective on many types while having a chance to lower the target’s Special Defense. However, Flying types are immune to it. You may consider switching it out for a move that you prefer instead.
Mewtwo
Mewtwo is Mew, but two. As in, he’s the second-best Mew around. Mewtwo is almost as good as Mew (remember, the tiers are unordered) but he’s lacking some defensive stats that are actually pretty crucial. Objectively though, they’re much more similar than they are different, and there’s a solid argument for bringing Mew down to A+ or putting Mewtwo in S. Their differences bring situational advantages, that’s all.
Mewtwo is another straightforward Legendary Psychic-type special attacker, featuring access to Nasty Plot, Psychic, Psychic Terrain, Expanding Force, Light Screen, Reflect, Calm Mind, Psystrike, Amnesia and any other moves that you might find necessary. There’s really a lot you can customize around a Mewtwo.
I recommend going with a straightforward but flexible Mewtwo build that runs as follows:
- Psychic
- Nasty Plot
- Expanding Force
- Psychic Terrain
This build lets you gauge the situation and decide whether you have enough time to set up three Nasty Plots and drop the hammer with Psychic, or whether you are potentially facing a stat wipe and so you put down a Psychic Terrain and Expanding Force, and try to continue self-healing with Expanding Force through the stat wipe thanks to the terrain boost. You’re not locked into one or the other, either, so use them appropriately.
There’s also the option of swapping Expanding Force and Psychic Terrain out for screens, or swapping Psychic out for Psystrike. Screens are a utility on all builds, but Mewtwo’s not usually going to have a hard time as his defensive stats are acceptable and he can often shrug a super effective hit from the opponent before self-healing. Swapping Psychic for Psystrike comes down to the stats of the opponent – will you do more damage with special damage, or physical?
Darkrai
Darkrai is, as one might imagine, a Dark-type attacker. Darkrai’s main schtick is that he puts the opponent to sleep and does… something. That’s not how we play him here: Tera shields block sleep moves and your best bet is with Hypnosis anyway, which is only 60% accurate, and it’s not like you’d do any real damage with your ability to the opponent. So instead we’ll play him as a straightforward stat-boosting and damage dealing build.
Darkrai runs:
- Dark Pulse
- Will-O-Wisp
- Calm Mind
- Nasty Plot
He can swap Nasty Plot or Calm Mind out for Taunt or Haze if you’d prefer.
The setup is easy: hit ’em with a Will-O-Wisp to cut their Attack in half, then drop a Calm Mind and then a Nasty Plot. Once you’ve got +3 Sp. Atk and a +1 Sp. Def, start whaling away with Dark Pulse. If your stats get wiped, build them up again and continue. Nothing complicated. Just put your EVs all into Sp. Atk and Def., because Calm Mind will cover you on the Sp. Def side.
G-Moltres
You like Moltres? How about a pissed off Moltres? Galarian Moltres has the ability Berserk, which tacks on a +1 Sp. Atk stage whenever he’s hit by an attack that takes him below half HP. In normal battles that’s a nice thing to have. In Tera Raids that’s going to happen all the time, so let’s plan for it!
Galarian Moltres runs:
- Fiery Wrath
- Nasty Plot
- Taunt
- Snarl
Unfortunately, Fiery Wrath doesn’t inflict flinch on Tera opponents. Bummer. However, we still have a lot to play with. In addition to a great Sp. Def stat and an acceptable Defense stat, Snarl drops the Tera opponent’s Sp. Atk stat by a stage and gives you a Tera Orb charge. It’s like Chilling Water, but for special attackers. So if you’re fighting a Tera Raid that only uses special attacks, or even mostly special attacks, you’ve really got it made. Just remember that you gain a Ground neutrality and pick up a Bug and Fighting type weakness when you Tera out of Dark/Flying into Dark.
Chi-Yu
Finding Nemo, meet Saving Private Ryan. What he lacks in physical Defense he makes up for in being able to hit like a tank after a single Nasty Plot. Chi-Yu runs:
- Nasty Plot
- Flamethrower
- Sunny Day
- Taunt/Will-O-Wisp/Reflect
Will-O-Wisp is helpful for when you’re needing to cut their physical attack down a notch with the burn status, and Reflect has the same idea behind it. Otherwise, Chi-Yu’s pretty straightforward. Plot something nasty. Make the sun shine if you think it’s necessary. Then commit federal crimes with a flamethrower. And he’s crazy powerful at it, too. He carries a 405 maximum Sp. Atk stat, and once you’re in the 400s, you’re playing with power.
Still, don’t ignore the physical downsides of Chi-Yu. To give you an idea of what we’re dealing with, the Flygon opponent’s Earthquake is about a 2-3 hit KO against Chi-Yu depending on conditions and before he drops Dragon Dance. Chi-Yu can take a hit, but he can’t always take two, so don’t take unnecessary risks with him.
A Tier – Special
Diancie
Diancie is a disappointment. Diancie has incredible stats besides her HP, so as long as she’s not getting hit super effectively, she should be okay. Problem is, she’s Rock and Fairy. Yeah. It’s easy to get hit super effectively when you’re weak to four of the most common types in Tera raids, so you’re not going to find a lot of scenarios where you can run her.
However, we make do, so Diancie runs this moveset:
- Fake Tears
- Calm Mind
- Meteor Beam
- Power Gem
There’s some flexibility in the exact moves that you run, so you may consider examining what other Rock type attacks Diancie has. Fake Tears is our alternative to Nasty Plot, because it lowers the opponent’s Special Defense until the shield comes up so you can hit with her Rock type attacks. That’s also the only thing Diancie is good for – Rock type attacks. There are basically no Rock type attackers that I can find, so we’re doing our best with this. She’s probably not going to die, her problem really is that she doesn’t do damage fast enough unless she’s hitting super effectively and has two Calm Minds under her belt. However, when she works she works, and sometimes she is the only thing that works.
Skeledirge
Skeledirge doesn’t have a fantastic moveset, but he does have one really, really good move offensively. Problem is, he’s a real glass cannon, so you may find you have to play on defense a little bit. That’s okay though. Skeledirge Fire runs:
- Torch Song
- Sunny Day
- Yawn
- Slack Off (consider Will-O-Wisp instead for Attack nerfing)
Torch Song’s use is obvious. Yawn is to put the opponent to sleep before the shield goes up, which buys you time to boost your Special Attack stat with Torch Song, allowing you to build your self-healing capabilities before you rely on them. Sunny Day is useful for boosting your Fire type attacks, and more importantly, neutralizing Water type attacks. With this raider, you’re going to spend a lot of time covering your butt by trying to do as much damage as possible, so it’s good to keep Water type attacks (or better yet, not using him against Water raids at all). And of course, Slack Off is your emergency alternative to a Heal Cheer. This is a build where using a Defense Cheer after the Tera shield goes up is a perfectly honorable strategy. Normally I’d poke fun at you a little bit for using a cheer, but with a glass cannon like this I think it’s appropriate.
There’s also the option of Skeledirge Ghost, who is a great contender for the bottom of the barrel. Skeledirge Ghost runs:
- Torch Song
- Shadow Ball
- Yawn
- Slack Off (or consider Will-O-Wisp for the Attack nerf)
Skeledirge has no way to raise Sp. Atk without Torch Song, so you’re still stuck using it to raise Sp. Atk, but once it gets to the level you want it at you’ll switch to Shadow Ball. It’s… not great. But it’s there, if you need someone to resist Fire and hit with Ghost.
Lunala
Lunala on his own is a pretty good Ghost type attacker, who has the potential to be really tanky. It’s basically the same idea as Necrozma, but not as inherently tanky. Lunala runs:
- Moongeist Beam
- Calm Mind
- Cosmic Power
- Shadow Ball
Build up your Tera orb charge with Shadow Ball, use a Cosmic Power if you’re getting hit with physical attacks for that juicy, juicy double defensive stat boost, use at least two Calm Minds, and then just whale away with Moongeist Beam. Whichever order you prefer to do these things in is up to you. However, if you have a Necrozma handy, you should always combine the two.
Magearna
Magearna is celebrated as a Tera Raider because of Soul-Heart, which raises her Sp. Atk each time some NPC partner dies. When she’s super effective, Soul-Heart works out really well because you’re doing enough damage to outpace the timer, and you’re self-healing more than enough to stay alive (provided as always that you’re not being hit super effectively), and when you’re not hitting super effectively, you at least have Soul-Heart to make up the difference.
However, there’s a problem, and this problem restricts Magearna to A tier; what if your NPC teammates don’t die that much, or your stats get reset at a bad time? Well, then you’re not going to perform that well anymore. It takes time to re-boost your Sp. Atk, and until it’s boosted enough you won’t be self-healing enough to stick around. We try to mitigate this with Calm Mind and by allocating maximum EVs to Defense (Calm Mind will cover Sp. Def boosts), but that doesn’t go far enough to place her in A+ tier.
Magearna runs:
- Flash Cannon (Dazzling Gleam if Fairy, don’t run Fleur Cannon)
- Calm Mind
- Metal Sound
- Misty Terrain
Magearna does have the ability to counter Sleep with Misty Terrain and has a great defensive profile, so she’s good. But she’s not a top tier raider.
Hoopa Unbound
Do you like Darkrai? Would you like him with a 4x weakness to Bug? Heck yeah you would!
Hoopa Unbound runs:
- Dark Pulse
- Nasty Plot
- Reflect
- Calm Mind
Hoopa Unbound’s a bit frail on the physical defense side. Actually, he’s really frail on the physical defense side, and that’s keeping him from being higher up on this list. Invest all your EVs into Def and Sp. Atk, drop a Reflect on the first turn and keep it up whenever possible, and build stats with Calm Mind and Nasty Plot as per usual.
I’d been asked about running Hyperspace Fury, the signature move, instead of Dark Pulse. We aren’t going to run that because 1) Hoopa doesn’t have a move to boost its physical attack and 2) the Defense stat drop is something you really can’t afford to have happen to Unbound. He’s only barely A tier viable with his current defense as it is.
By the way, you can swap Hoopa Unbound’s Tera to Psychic and switch Dark Pulse to Psychic, and you’d have a similarly decent Psychic type attacker. It’s just… look at the number of Psychics on this list! Use him for the Dark type instead.
Espathra
You’ve probably heard that Espathra is a top tier raider, and that’s very true… in 5-star raids. Espathra raids differ, but they most successfully run:
- Calm Mind
- Lumina Crash
- Stored Power
- Reflect
I’ve relegated most Stored Power builds to the general Stored Power category, but Espathra’s a bit better than the rest because of Speed Boost, which gives it a (as you might imagine) speed boost at the end of each turn, and that’s counted in Stored Power calculations. Additionally, Lumina Crash functions like a Psychic-type 80 Base Power Acid Spray, so you can start by getting a few Tera charges before going into Stored Power nuke mode.
So why’s he only A tier? Well… this guy’s frail. He can mostly compensate for his awful Sp. Def stat with Calm Mind, but all he can do to beef up his physical side is either Reflect or Feather Dance. Reflect lasts even through a Tera Shield, so that’s what you should run. I found that against most physical attacker Tera Raids Espathra is a 2-3 hit KO, and Reflect didn’t help enough to earn him a higher placement.
Raikou
I’ll preface this by saying there’s a million ways you can run this build, and I’ve never, not once, seen this build idea online. Typically I’ll see something close to my builds but a few moves off, but this one? Brand new.
This is a Speed-based build. Raikou runs:
- Calm Mind
- Agility
- Electroweb
- Electro Ball
Do you see it? Raikou can maximize his damage output by getting the most out of Electro Ball, which when he’s 4x faster than the opponent hits at a Base Power of 150. I’m not sure whether you should run Timid or Modest nature, invest in Sp. Atk or Speed (of course the other half goes into Defense), and what combination of Electroweb and Agility should be used, so there’s still plenty of room for optimization in this build and playstyle. Still, it’s a stinkin’ cool build idea and Raikou is uniquely suited to use it.
I’ll admit that this one takes a lot of turns (typically three to four) to set up, which is its greatest flaw by far as Raikou can tank about five hits at worst. It’ll usually need at least four turns before you’ve got your Speed up enough to make it worthwhile, so consider to be right on the line between A and B tier. But man is it fantastic against those slow raid boss opponents!
Entei
He’s the sugar-free, Fire type version of Kyogre. Entei runs:
- Flamethrower
- Calm Mind
- Eruption
- Sunny Day
He’s bulky enough on the physical side to usually be okay (and Calm Mind will take care of the Sp. Def side), so you’re not too worried about that. The real problem for Entei is damage output, as with only one Calm Mind he’s not gonna cut it. Fortunately, he has Sunny Day and Eruption to help, and you can always drop another Calm Mind if needed. I will say, Eruption usually ends up being the solution to a lot of Entei’s problems, as he is often over 60% HP (the threshold at which Eruption is a better choice than Flamethrower).
B Tier – Special
I consider the line between A tier and B tier to be somewhat important – if you are A tier or above, you don’t necessarily have to be super effective against the type of the opponent to win. If you are B tier or below, you do. If you’re deciding which builds to build, you should always start above B tier, and only consider ones B tier or below if you cannot afford any of the better ones.
Enamorus-Incarnate
Enamorus-Incarnate is a wildly different beast than her counterpart. For starters, this build and Terapagos are the only two times I will ever tell you you absolutely have to be Stellar Tera type (though it may be useful, but not optimal, on Gholdengo and other builds that attack with two types). That’s because this build uses:
- Tera Blast
- Draining Kiss
- Taunt
- Misty Terrain
If you squint at that build a little bit, you’ll see what I’m going for. If you haven’t seen it yet, consider this: it will use the Contrary ability. Yep, now you see it.
The Contrary ability reverses any stat drops that hit your Pokémon. There are many Contrary ability theorycrafts out there, and I haven’t had the chance to try many of them, but this one is definitely a pretty good one. Basically, you hit Draining Kiss to stay alive until you charge your orb, drop a Misty Terrain at some point to prevent status infliction, and then rain Tera Blasts as much as you possibly can. Tera Blast when Stellar Tera-typed typically drops your Attack and Special Attack stats by one, kind of like Close Combat, but the Contrary ability turns it into a boost. It also becomes base power 100, and is guaranteed super effective against the raid opponent. You’ve got 16 shots with this thing – make them count!
The cumulative effect of this build is that you’re basically boosting your Special Attack each time you use it, so the more times you use it without having your stats nerfed the more powerful you will be. This is why it is extremely important that you DO NOT DIE. If you die, you cannot Terastalize again, at which point you have lost irrevocably.
The downside of this build is her typing. Typing is not typically a large concern in raids so long as you are not being hit super effectively, and you are hitting the opponent super effectively. However, Fairy and Flying types together have kind of a random assortment of things to get hit super effectively by. Steel, Poison, Electric, Ice and Rock together makes up about 1/3 of the possible types. Keep an eye out for all of these types in the Pokémon that you’re fighting, lest you lose.
Regice
Regice is a raid build that I really tried to squeeze a lot of juice out of, and the result is one of the weirdest builds I’ve ever seen. He runs:
- Snowscape
- Blizzard
- Charge Beam
- Thunder Wave
Regice does not have Calm Mind or Nasty Plot, and has no other way to boost his own Special Attack other than Charge Beam, which boosts Special Attack 70% of the time. The result of this is a build that is uniquely suited for fighting Flying types exclusively. While there are plenty of better options to take out Flying types, such as the many Electric types available to us, Regice has no weakness to Ground like the other builds do. So keep him around!
The strat is not straightforward really! Put up a Thunder Wave on the opponent to get an early paralysis, use Charge Beam as many times as it takes to get two Special Attack boosts, put up a Snowscape so Blizzard is a guaranteed hit, and then use Blizzard until your stats get wiped. Once your stats get wiped, keep using Charge Beam and try to reset the field in your favor. Snowscape is also just kind of required for Regice because you also get 1/16 of your HP back each turn, just like holding Leftovers in addition to your Shell Bell gains.
Stored Power Build
Stored Power builds are very common, because any Pokémon with Stored Power that can also run any sort of self-stat boosting move can run a Stored Power build. I’ve seen tons of them, and they’re most popular when people can’t figure out seven-star raids. Slowbro seems to be everyone’s favorite for some reason.
Because of the ubiquity of great Psychic type attackers, and the shortage of reasons to use a Psychic type attacker, I wouldn’t make a Stored Power build your only Psychic type attacker. However, if it works, it works, so you may consider keeping one in the backfield just in case. Still, your stats will get wiped at least once in a six-star raid, and in the DLC raids usually twice, and there are some types that resist Psychic, so don’t rely on it too much.
Vaporeon
Vaporeon is not a particularly impressive Water type attacker, but there’s not many impressive Water type attackers in general. The most important thing for Vaporeon is that you use a shiny Vaporeon – it doesn’t change anything about the raid, but it just looks cool.
Seriously though, Vaporeon should run these moves:
- Surf
- Acid Armor
- Calm Mind
- Rain Dance
with the Hydration ability. It’s pretty obvious as to why: Rain Dance keeps your statuses away and boosts Water damage, Acid Armor keeps you physically defensive to make up for the terrible Physical Defense stat, Calm Mind boosts your Special Attack, and Surf is your main Water type attack. Surf is 90 base power with really no fringe benefits to it, so it’s not that great unless it’s hitting super effectively. If you don’t have Kyogre, then I guess Vaporeon is your best bet, but it’s not a great bet. Still, he’s better than:
Suicune
Suicune runs kind of a similar moveset to Vaporeon. She runs:
- Surf
- Scald
- Calm Mind
- Rain Dance
This is a strictly inferior moveset to what Vaporeon has because you lose the defensiveness of Acid Armor in the hopes of gaining a burn status with Scald. Burn statuses cut the enemy’s Physical Attack in half, which is kind of like giving yourself a Defense boost, but it comes at the cost of only working 30% of the time and losing 10 base power. I recommend dropping a Rain Dance, two to three Calm Minds and then hitting with Scald until you get a burn, at which point you should switch to Surf. Suicune is glassy at best and tends to die the most out of the three Water types in this tier.
Manaphy
Manaphy is an interesting Water raider because, while Manaphy does run the expected Scald, Surf, Rain Dance combination, she also runs Tail Glow. So her moveset includes an extremely unique move. Tail Glow is just Nasty Plot but it boosts your Special Attack by an extra stage, so if you use it twice, you’re at maximum Special Attack. Unfortunately, Manaphy has no way to boost her own Defense, so she is the most glass cannony of these three, but also has base 100 across the board, so you’re really not giving up much when you use Manaphy over the Vaporeon or Suicune options. I’d say Manaphy is probably the fastest killer of the three since you don’t need to spend as much time powering up.
Keldeo
Keldeo’s ability Justified makes for a unique situation when fighting a Dark-type Pokemon, as getting hit by a Dark-type move raises his Attack… which doesn’t help us here. So that’s fun. At least he’s uniquely a Special Fighting-type attacker.
Keldeo Fighting runs:
- Secret Sword (or Aura Sphere)
- Calm Mind
- Taunt
- Reflect
Keldeo Water runs:
- Surf
- Calm Mind
- Taunt or Rain Dance
- Reflect
For both builds, put all your EVs into Defense, because Calm Mind will cover you on Sp. Def. And you’re going to need it, too – his stats aren’t great besides his Sp. Atk.
For his Fighting build, keep in mind Secret Sword uses the opponent’s physical Defense stat, not their typical Sp. Def stat like you’d expect. You can still self-boost your Sp. Atk stat and it’ll increase damage output, it just switches which of their stats it takes into account. That factoid doesn’t often make a difference in Raids, but I’ve seen it help here and there. If you’d rather give up 5 base power and use their Sp. Def stat instead, Aura Sphere’s got your back.
And no, I didn’t intentionally place the 4 Water users in a row next to each other, that’s just kinda how it happened.
Cresselia
Cresselia has one reason you’d use her over the other Psychic-type users, and that’s her immunity to Ground moves. She’s got good defensive stats, terrible Sp. Atk stats and when the earth is quakin’, she’s not shakin’. That’s Cresselia.
Cresselia runs:
- Psychic
- Reflect
- Calm Mind
- Psychic Terrain
Cresselia will struggle with damage output far more than with staying alive, so don’t be afraid to drop 3 Calm Minds before you even get started. Actually, don’t do anything less than 3 Calm Minds. She can’t cut it without that. Otherwise, it’s a typical build. Drop a Reflect, your Calm Minds and a Psychic Terrain, and start hitting the opponent. If you’re not doing enough damage, drop another Calm Mind. Just keep an eye on that mid-raid stat wipe.
G-Articuno
Talk about a Pokemon who could have had real potential in a crowded field. The big draw for Galarian Articuno is Freezing Glare, one of the rare usable moves that can also inflict Frozen. Its 10% chance to cause freeze means that in a Tera Raid you’re pretty likely to get at least one Freeze off, buying you time to set up screens, boost, whatever. Problem is, he just isn’t sturdy enough to do something like that. Galarian Articuno will typically crumple unless he can set a screen, and even then he’ll struggle to keep up without a Freeze unless he goes into the Tera Shield with a screen up.
Galarian Articuno runs:
- Freezing Glare/Psychic
- Calm Mind
- Reflect
- Light Screen
As always, put your EVs into Sp. Atk and Defense so Calm Mind takes care of the Sp. Def. Psychic is a useful alternative to Freezing Glare if you’re wanting to get a Sp. Def drop, but let’s be real… Frozen status is almost certainly more valuable.
Wo-Chien
Wo-Chien is confusing to place, as he seems to be sometimes victorious when not super effective (earning him a spot in A tier, over the line) but only barely so, and sometimes a failure, but only barely so. Giga Drain strats are weird like that. If you’re the type to reroll NPC partners, Wo-Chien pairs extremely well with Arboliva.
Wo-Chien runs:
- Giga Drain
- Growth
- Sunny Day
- Solar Blade/Stun Spore/Reflect/Light Screen/Taunt/Grassy Terrain/Solar Beam
Bearing in mind that Growth boosts your Sp. Atk and Attack by +2 instead of +1 in the sun, we are only left with what you run for that last move slot. Honestly, all of the above options have their niche. I’d encourage Light Screen to make up for his lower Defense stat, but Wo-Chien will rarely have a hard time staying alive if he’s not being hit super effectively, so you’re not really going to need it. Grassy Terrain will boost your Giga Drain damage, Stun Spore inflicts Paralysis, etc.
He’s not fantastic unless he’s super effective, but if you need a tanky Grass user and don’t feel like replaying Legends: Arceus and paying for a HOME subscription Wo-Chien can be useful.
Thundurus-Therian
On the rare occasion you’re getting blasted by terribly powerful Electric-type attacks, Thundurus-Therian is one of your best friends. Volt Absorb restores your HP whenever you get hit by one, so the Tera Raid opponent simply won’t use Electric attacks any more.
Thundurus-Therian runs:
- Nasty Plot
- Rain Dance
- Wildbolt Storm/Thunder
- Charge
The strategy here is taking a long time to set up so you can do a lotta damage. Nasty Plots and a Rain Dance means you’ll be dropping Wildbolt Storms and Thunders with perfect accuracy. Problem is, Thunder is a sidegrade to Wildbolt Storm. Thunder has 10 more base power but is 10% less accurate without the rain being set up, making Wildbolt Storm the better move in emergencies but making Thunder the better move if you can set rain unopposed and have the time to do so. I prefer Wildbolt Storm, because Thundurus-Therian’s a bit light on the defensive side (though Charge can provide a Sp. Def boost, which I encourage) so you never know when you’ll need a reliable self-heal in a pinch.
The thing holding Thundurus back is that absurdly long setup time, as you’ll need at least a Rain Dance and one, preferably two Nasty Plots. That’s taking three hits before you can hit anyone back. Oh, and if you’re facing a special attacker you need a Charge as well. And if your stats get wiped or the weather goes away you have to stop and build that back up too. See the problem here?
Volcarona
Volcarona might honestly be the best Bug-type attacker in the game, which is a real insult to the Bug type. Volcarona’s frail but has a fantastic moveset and acceptably good Speed to compensate somewhat, which will improve quickly. He’s also got Swarm, which is awesome for weak Bug users. Volcarona runs:
- Quiver Dance
- Bug Buzz
- Lunge
- Leech Life/Struggle Bug/Will-O-Wisp
The basic idea here is that Quiver Dance is your souped-up version of Calm Mind, Bug Buzz is your primary attack that conveniently has a chance to lower the enemy’s Sp. Def, and if you’re facing a physical attacker – uh oh! – you have a weak Defense stat so you need Lunge to cut his physical attacks down to size. Volcarona rules against special attackers, it’s physical ones that give him a hard time. So Lunge a bit and you should be okay.
The last move is up to you, as Leech Life is useful for healing a bit during setup if needed and also grabbing a Tera charge, Struggle Bug lets you specialize against special attacker opponents and Will-O-Wisp cuts down physical attacker’s damage in half.
C+ Tier – Special
Eternatus
You’d think I’d be able to find Eternatus a better moveset, but his stats go one way while his moves go the other. He runs:
- Sludge Wave
- Venoshock
- Cosmic Power
- Recover
His big flaw is not his stats, but rather the fact that he just can’t seem to do any real damage without getting a lucky poison. To this end, your strategy is simple: drop a Cosmic Power at the beginning, hit Sludge Wave until you get a poison, and then hit Venoshock. If one of your Tera raid partners puts a status effect on the opponent first, you lose! You won’t be able to do enough damage without the boost from Venoshock. I hate this build.
Blood Moon Ursaluna
Ursaluna dangles on the edge of uselessness, but his possession of Calm Mind and Fake Tears rescues him slightly. He runs:
- Calm Mind
- Earth Power
- Taunt
- Fake Tears
Which should be a pretty good moveset on paper. The downside is that he’s weak to basically everything under the sun, and even when he’s not getting hit super effectively he seems to just die. However, this is your only real option for special attack Ground type attackers because Earth Power is the only special attack with Ground typing. Good luck.
Sylveon
Sylveon is the budget form of the other Fairy types on this list. Sylveon runs:
- Calm Mind
- Reflect/Hyper Beam
- Misty Terrain
- Moonblast/Draining Kiss
Sylveon is more viable when running Moonblast over Draining Kiss, but if you’re not the type to check what moves the raid opponent is running before selecting a raider… you’re in trouble. Put simply, Sylveon is very physically frail. To that end, Reflect and Draining Kiss have the ability to pull your jewels out of the fire if you’re being hit by physical attacks that you didn’t expect. However, if you do know you’re not expecting physical attacks, then (assuming Pixilate is your ability. because Cute Charm doesn’t work in Tera Raids) running Moonblast and Hyper Beam is the better option. Hyper Beam’s sort of your last-ditch self-heal effort should you need it, and you probably will at some point. Fortunately, Pixilate makes it Fairy type, so you get STAB, Calm Mind boosts and a second STAB if Terastallized, so it’s a nuke worth dropping. Just… don’t miss.
Jirachi
Gen 4 competitive players rejoice, your king has fallen. Serene Grace is still active in Tera Raids… but Iron Head’s flinch is not. Where you’d think there would be a 60% chance to flinch the opponent every turn (which would render Jirachi possibly the best Tera Raider ever), there is instead disappointment made worse by the fact that Jirachi has access to one of the best moves in the game (Cosmic Power) but not enough damage output to be particularly useful when not super effective.
Jirachi’s Steel options make her an alternative and downgrade to Gholdengo Steel, should you need one. Defensively they’re identical, almost, with Gholdengo having additional resistances and immunities (those being an extra immunity to Fighting and Normal, and a 4x Bug resistance that Jirachi lacks, while Jirachi only has a 4x resistance to Psychic over Gholdengo), but they’re both weak to the same things. Jirachi is a bit bulkier all around but loses a large chunk of the Sp. Atk stat, so it’s something of a trade-off between the two.
Jirachi as Steel runs:
- Flash Cannon
- Steel Beam/Metal Sound
- Cosmic Power
- Calm Mind
Cosmic Power is legitimately the best defensive move in Tera Raids, bar none, so Jirachi dying isn’t that much of a concern. It’s damage output that’s holding her back, and she doesn’t really have a solution to that besides stacking a buncha Calm Minds. We don’t have Doom Desire here because it’s glitched, so our only other choices are Steel Beam or Metal Sound. Steel Beam takes half your HP when you use it (though hopefully that’s self-healed back to you) and Metal Sound cuts their Sp. Def.
Jirachi Psychic runs:
- Psychic
- Psychic Terrain
- Calm Mind
- Cosmic Power
Jirachi Psychic has a little bit of an edge because, while her moves aren’t as good, she has Psychic Terrain for a temporary boost. Otherwise it’s the same story as Jirachi Steel; both are pretty dependent on procing that Sp. Def drop at least once in the raid, otherwise they’ll have to drop at least 4 Calm Minds to put out enough damage to win when not super effective… and if your stats get wiped after building that you’re largely done.
Serperior
You want a glass cannon? You’ve got one. Contrary Serperior’s gimmick is to Tera into Stellar and use Stellar Tera Blast, which normally reduces both attack stats by one… except it’s Contrary, so they increase. Great! Problem is, you’re a really frail attacker.
Serperior runs:
- Tera Blast
- Giga Drain
- Taunt
- Light Screen
Taunt and Light Screen are both discretionary, but I encourage them both over any alternatives.
The real problem with Serperior is that even if he’s super effective and not having defensive struggles, he isn’t going to output enough damage to justify running him over another Grass-type option until he’s about +4 on his stat stages, and that takes a lot of time to get up to, and he’s extremely vulnerable to the mid-raid stat wipe.
Latios & Latias
I’m not entirely sure what I’m doing wrong with Dragon Lati Twins, but I seem to be unable to get any real mileage out of it beyond what I’d get from the other C+ tiers. The Twins require x3 Calm Minds to do any real damage (though fortunately you have Chilling Water to mitigate physical damage in the meantime) and that’s not easy to pull off without knowing exactly when the stat wipe is going to come. Basically, raids with an early stat wipe tend to rule out the twins as an option.
Lati Twins Dragon can:
- Dragon Pulse
- Calm Mind
- Chilling Water/Reflect
- Thunder Wave/Draco Meteor
The Thunder Wave/Draco Meteor decision is up to you, and there’s probably other utility moves out there you may find useful.
The real upside of the Lati Twins is their resistances – they resist Fighting, Fire, Water, Grass, Electric and Psychic and are immune to Ground thanks to Levitate. That’s really, really helpful in some specific raids, and it’s honestly one of the better resistance charts available to you.
C Tier – Special
Arceus without Shell Bell
Special attacker Arceus without Shell Bell relies on Recover to gain HP, as he has no other non-Grass self-healing moves. That stuff’ll work over on the physical tier list (Arceus-Normal is pretty good, thanks to Shell Bell) but it won’t work over here.
Still, most people attempting this build try:
- Judgement
- Recover
- Acid Spray (consider Cosmic Power instead)
- Calm Mind
I should mention that Arceus will waste a lot of turns using Recover to gain HP unless you run Cosmic Power. Frankly, you can also swap Calm Mind with Cosmic Power instead, as Acid Spray gives you a similar effect to a degree. It’s the kind of build that can work if you force it to, but why bother forcing it to?
Deoxys without Psychic Builds
You can try it, and you’ll win about 1/5 of the time. Even when super effective. Don’t do it. You won’t do enough damage and you’re missing out on STAB, so you’ll not outpace the clock.
Deoxys without Psychic-type attacks runs:
- Nasty Plot
- Cosmic Power
- (attack of preferred type)
Deoxys-Defense isn’t powerful enough to deal damage to outpace the clock without STAB. Even with STAB that Psychic Terrain is kind of your best shot, so why switch off Psychic?
Tornadus – Therian
Let’s say you’re facing a Bug Tera, and you don’t have access to any Flying, Fire or Rock builds. It’s not unheard of – Armarouge is weak to several things, and Lugia and Diancie are sometimes hard to get a hold of. Understandable.
In that scenario, you may have a reason to use Tornadus-Therian. T-T works well if he’s resisting what’s being thrown at him, and he’s hitting super effectively, and there’s no weather wars going on. If he can set up two Nasty Plots and rain, and survive long enough to land a Bleakwind Storm, then he’ll self-heal enough to dig himself out from the low-HP mess he’s gotten himself into. (Honestly, you may be better off starting with a Defense cheer to make sure you live that long.)
Tornadus-Therian typically runs:
- Nasty Plot
- Bleakwind Storm
- Rain Dance
- Air Slash (Tailwind is optional)
Air Slash is your “break glass if dead” move, where you don’t have enough HP to set up rain before your next Bleakwind Storm, but you don’t want to take the 20% chance that you’re going to miss your shot and die, so you take the safer 95% hit chance with Air Slash. Tailwind can help with that by making you faster, but it doesn’t heal you.
A-Ninetales
Snow Warning is the pin holding this build together: when Alolan Ninetales spawns in, she’ll bring Snow with her, allowing her to then use Aurora Veil which cuts all damage in half. Hooray! Problem is, you’re reliant on that, because she’s not the best defensively. Snow Cloak is her other ability, which raises her evasion to 1.25 in the snow, but that’s not as helpful as Aurora Veil.
Alolan Ninetales runs:
- Nasty Plot
- Ice Beam
- Aurora Veil
- Snowscape
There is an upside to this build that could conceivably push her to C+, and that’s the 10% Ice Beam freeze chance. By the numbers, you’ll usually shoot about 8-12 Ice Beams per raid, so you can expect most of the time to get at least one freeze. That freeze lets you reset snow onto the field and drop another Aurora Veil, Nasty Plot, whatever you need. She’s niche, but in good conditions she can pull it off.
The Physical Attacker Tera Raid Builds Tier List
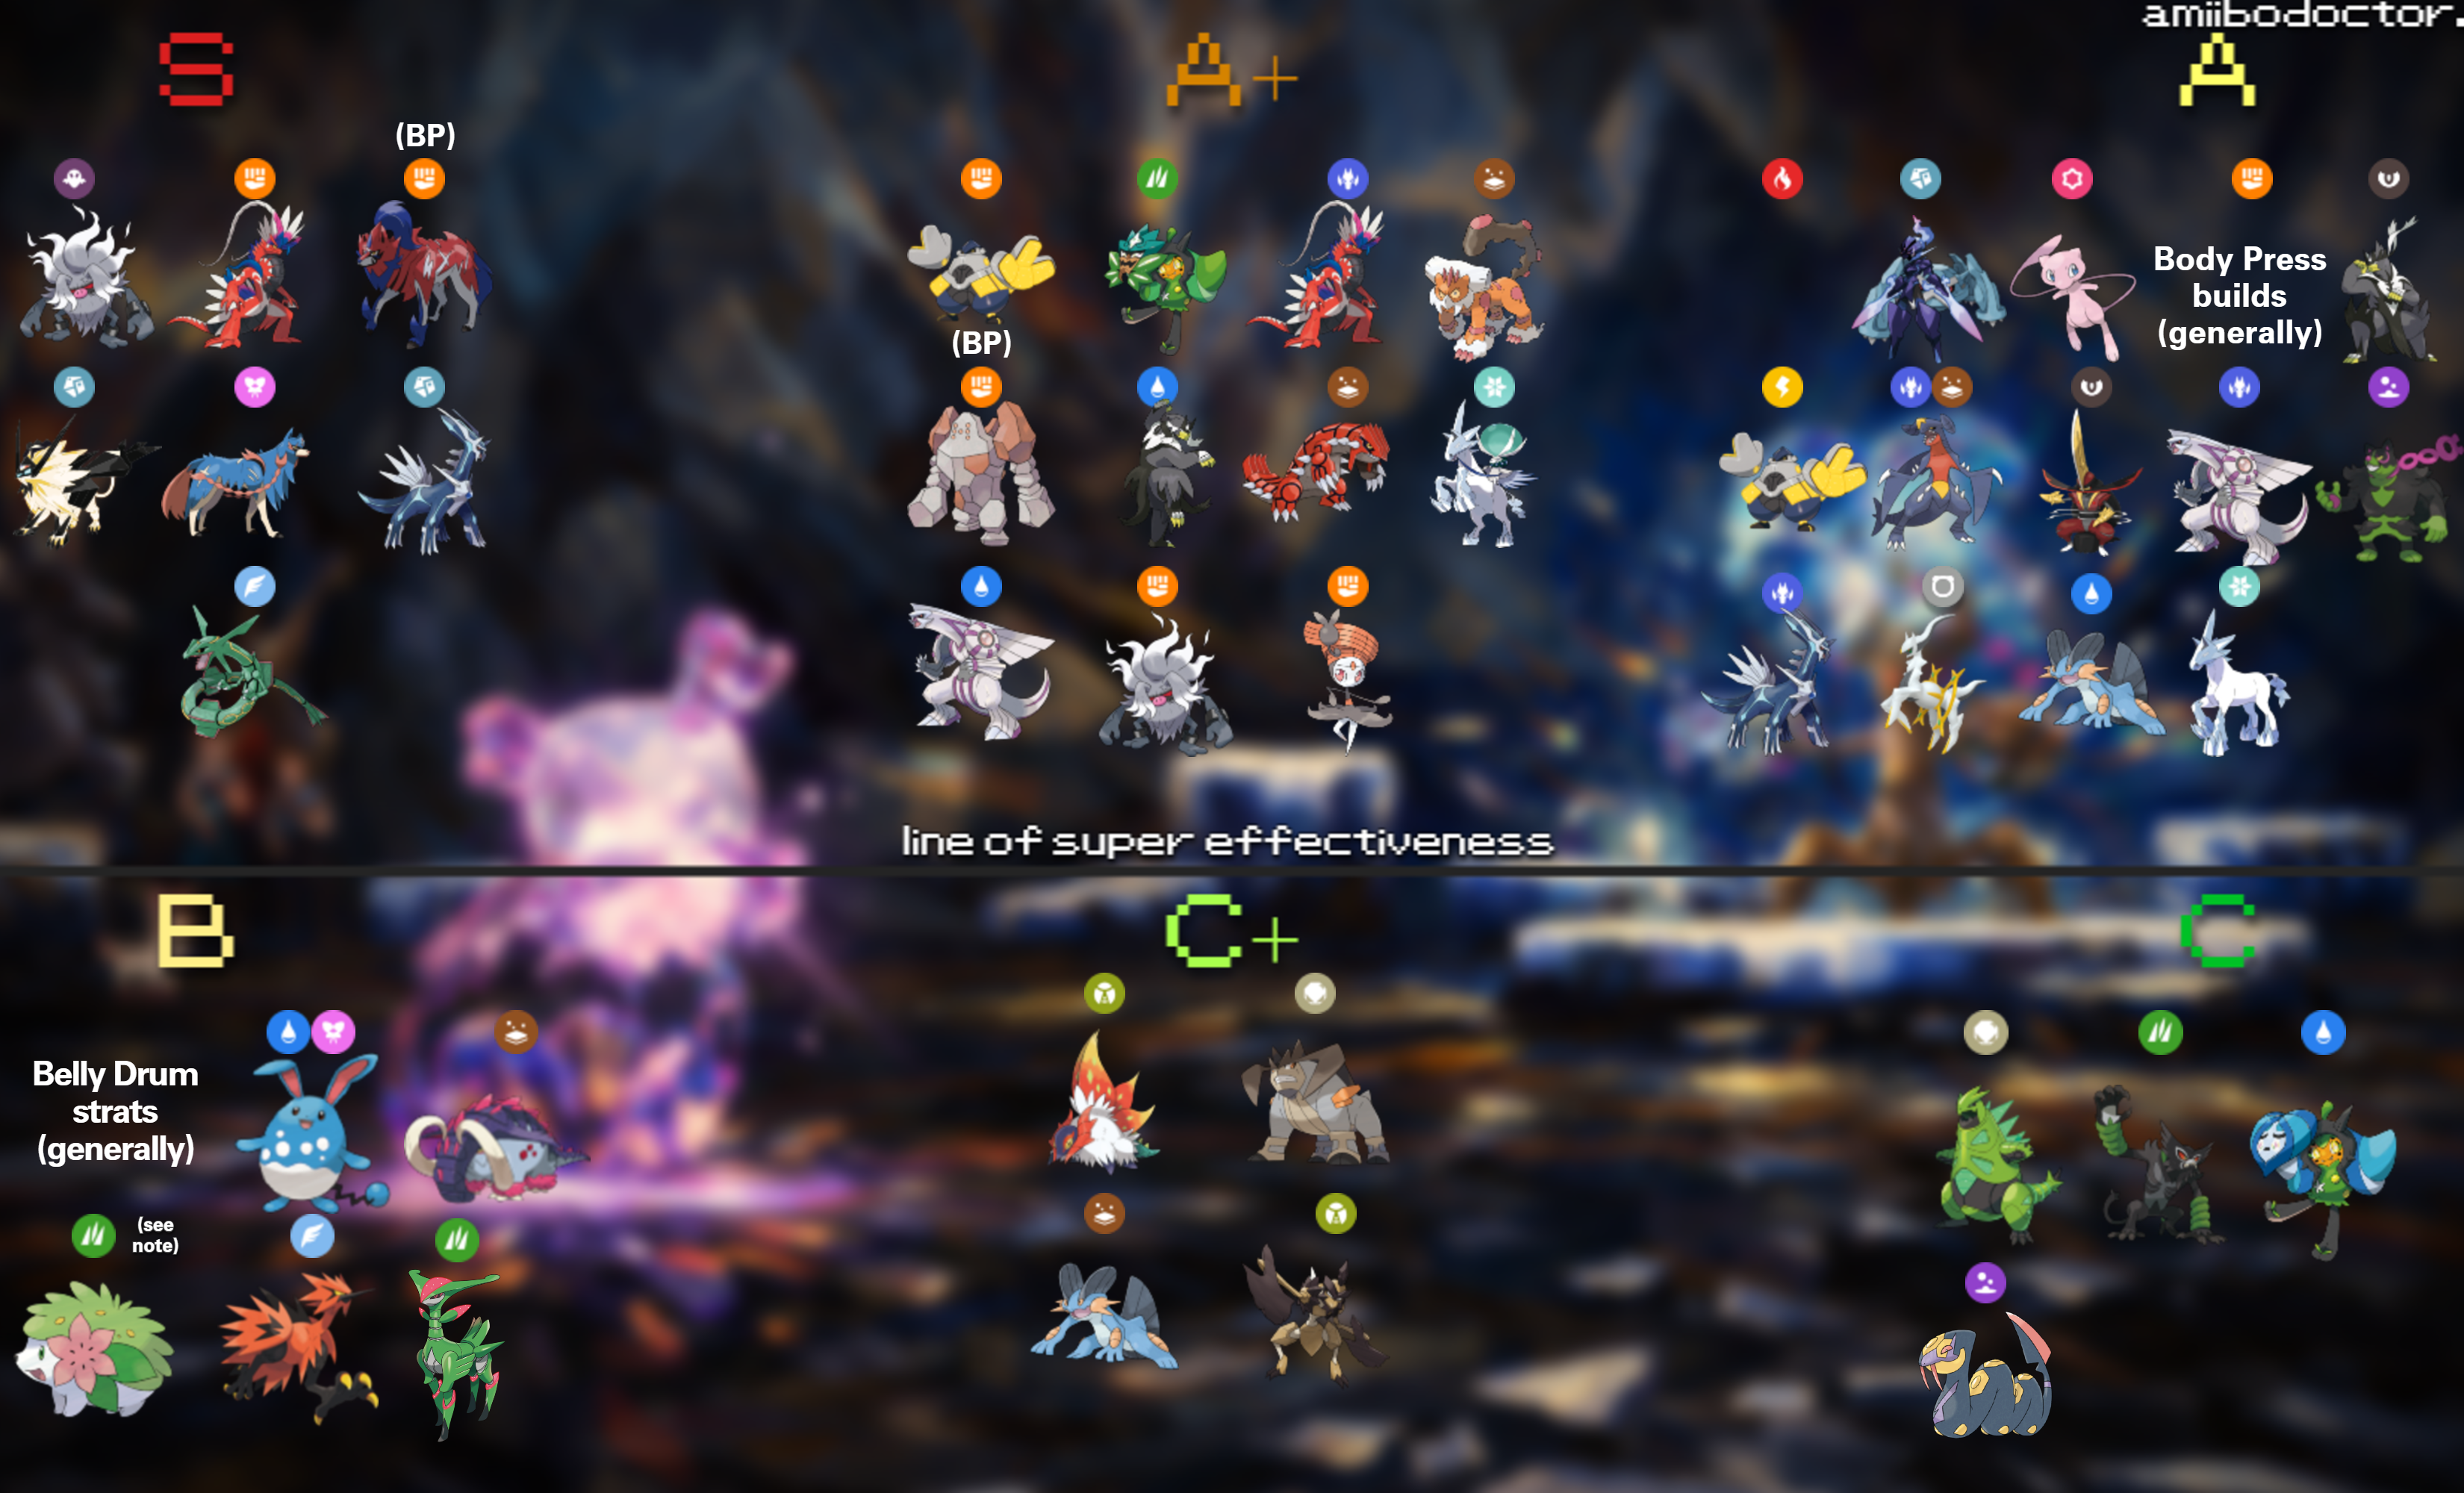
The physical attackers tier list is a more uphill battle compared to the special attackers tier list, due in no small part to the number of mechanics that are set up against the benefit of physical attackers. For starters, there’s much less distribution of Bulk Up and Swords Dance compared to Calm Mind and Nasty Plot. This severely truncates the pool of potentially usable Pokémon that we have available.
Second, many high stat physical attacking types have some sort of trade-off to them such as having low Defense or Special Defense, or not having moves to boost those stats. While that is a problem that special attackers had, at least the special attackers had wider distribution of Calm Mind and Nasty Plot to make up for it. The physical attackers have no such advantage. Additionally, some key attacking types such as Rock type and Flying type which are primarily physical also contain built-in imperfect accuracy. This severely limits their reliability in Tera raids, which is deeply unfortunate as Rock and Flying types would theoretically be two of the best offensive types for Tera raids. Let’s not forget that Burn status halves your Attack while no equivalent exists for Special Attack. You get the idea.
(Having said that, the S tiers on the physical tier list are on average better than the ones in the special tier list, in my opinion. It’s a weird outcome, I know.)
The basic thought process for all of these is almost exactly the same as with special attackers: everyone’s holding Shell Bell unless otherwise stated, boosting their own stats, and self-healing by doing a lot of damage thanks to Shell Bell. You’ll also notice that there are nowhere near as many options to deal with sleep outside of Sleep Talk. I’ve not yet thought up a solution to that problem.
S Tier – Physical
Annihilape
Annihilape is unimaginably offensively potent. This is because his moveset consists basically of:
- Bulk Up
- Rage Fist/Drain Punch
- Taunt/Focus Energy/Screech
- Pick a second move from the above bullet
The strategy is pretty obvious: use a few Bulk Ups, one of the three secondary options if the Tera shield is not up yet, and then either Rage Fist or Drain Punch, whichever type you are. Rage Fist ends up being a base power 300 in pretty much every Tera raid, because you’re going to get hit a lot by the opponent, and Drain Punch with even a single Bulk Up will typically heal you back to full. Unfortunately, you’re not going to be able to use Drain Punch against Ghost types, and you’re not going to be able to use Rage Fist against Normal types, so you’ll need two builds to really maximize his usefulness.
Annihilape Ghost is noticeably better than Annihilape Fighting because while Annihilape Fighting can run an item besides Shell Bell (run Life Orb for Fighting Annihilape by the way), there’s just nothing that really stands up to a 300 base power Ghost move besides the Normal type. Never mind that Focus Energy is going to nab you some crits until the midraid stat wipe!
Oh, and run Vital Spirit on him if you want him to be useful in Sleep builds. There’s a lot of raids that run Sleep and have no real counterplay, so… use it!
Koraidon
Koraidon has two optional attacking types as well. He can go with Fighting type, which is what he was designed for, or he can go with Dragon type. The Fighting type option consists of:
- Bulk Up/Swords Dance
- Collision Course
- Drain Punch
- Screech
I encourage Bulk Up over Swords Dance because you get the defense boost, and it’s not like you need more attack boosts than you need at least one defense boost. However, you can switch out Screech for Sunny Day if you would prefer to keep his ability useful throughout the end of the battle. Screech stops being effective when the shield goes up.
His Dragon type option is similar: instead of Collision Course, you have Dragon Claw. You’ll keep Drain Punch and Bulk Up, as Drain Punch is the best HP recovery option available to just about any Pokémon, and Bulk Up is of course always necessary.
Zamazenta (and Body Press Analysis)
Zamazenta is one of the best Body Press users, although Body Press strategies in general are pretty darn good. Zamazenta is straightforward:
- Iron Defense
- Body Press
- (Brick Break and Coaching are nice too)
Iron Defense plus Body Press equals high defense which translates into extremely high attack stats. Dropping two Iron Defense and switching that into a Body Press is pretty much all you need. Also, he basically never dies because he has an over 300 special defense stat when fully leveled, which is way more than enough for what you need. Other Body Press strategies are really good as well, which is why I’ve kind of pulled them together and put them in a tier, although you should of course feel free to experiment if you really want Body Press. Unfortunately, Body Press is a Fighting type move, and the competition for being the best Fighting type move is extremely difficult with physical attackers.
Please take note that Zamazenta runs Shell Bell, not the Rusted Shield.
Dusk Mane Necrozma
At present, the only non-Fighting type Pokémon that I would consider to be S tier is Dusk Mane Necrozma. Dusk Mane is a Steel type who runs:
- Swords Dance
- Iron Defense
- Sunsteel Strike
- Iron Head
Fortunately, his Psychic and Steel typing and Steel Tera typing makes him a viable alternative to your Fighting types if your opponent Pokémon is a Fairy type. You’ll notice that everything else in S tier is weak to Fairy and Psychic both, and Dusk Mane Necrozma happens to resist both of those. That’s not by design: it’s just convenient.
Zacian
Zacian is the best Fairy type attacker you’ll find, although he suffers from Play Rough syndrome, which is what I call the fact that he can only hit with 90% accuracy. He’s pretty straightforward: he runs:
- Play Rough
- Swords Dance
- Noble Roar
- Iron Defense
Zacian make sure to hold a Shell Bell instead of the Rusted Sword, because the Rusted Sword form does not actually help us. Besides, it’s probably better to have the solo Fairy typing anyway. Zacian does hit pretty hard, and can hit harder than some of the S tiers, but his defense is lower and he’s especially weak to special defense boosting Poison and Steel types which are more common than you’d think.
Dialga
Dialga’s typing is, quite frequently, the answer to many raids. You’ll often see scenarios where he resists everything or almost everything they can throw at him, and he’s tanky enough that whatever he does get with is irrelevant. Dialga has one flaw, and that’s damage output. It’s acceptable, but it takes a lot of stat building to get there, so you’ll find yourself using three or four turns before you can start taking the shot.
(Also, it’s super dumb that he doesn’t have Calm Mind. Dialga would be a phenomenal special attacker!)
Dialga runs:
- Bulk Up
- Iron Head
- Tera Blast
- Thunder Wave
Dialga’s pretty straightforward: use some Bulk Ups, then Iron Head, and Tera Blast if you need it. Note that Iron Head doesn’t cause flinching against a Tera Raid. Dialga’s also perfectly functional as a Dragon-type attacker, it’s just not as good because of the seriously good defensive benefits of having a Steel Tera over a Dragon Tera. Dialga Dragon just swaps Iron Head for Dragon Claw.
Rayquaza
I’ll stop you now: no, we’re not running Dragon Ascent. Dragon Ascent cuts your Defense and Sp. Def and you have no easy way to get them back, so you’re not running that.
Rayquaza runs:
- Air Slash
- Swords Dance
- Tera Blast
- Bulk Up
Rayquaza’s really quite odd. He doesn’t have any good physical Flying type attacks, so to charge the Tera Orb we go with the 95% accurate Air Slash. The slight inconsistency with Air Slash is good cause for an A+ placement, but he’s just so powerful once he gets the Tera that it doesn’t matter. He’s tanky, can fight weather wars, can self-boost Defense but still has Swords Dance, he’s fantastic. He’s also just about your only real Flying-type option for Tera Raids, so have fun with that.
A+ Tier – Physical
Ogerpon (Grass)
Ogerpon is the best Grass type attacker that we have, which is unfortunate as he basically requires either the Miracle Seed or the Shell Bell to be functional, limiting his ability to Tera raid with his other types. That’s the trade-off with Ogerpon: if you go with one of the other types, you still can only self heal with Grass type attacks, so why would you limit yourself to that? Instead, don’t have him hold a mask, have him hold a Miracle Seed or Shell Bell. Miracle Seed boosts your Grass type attacks better, which by my math makes it slightly more effective than Shell Bell when running his moveset:
- Ivy Cudgel
- Horn Leech
- Swords Dance
- Grassy Terrain
Each of these are pretty straightforward: Ivy Cudgel is the move that you use to do most of your damage. Horn Leech is how you self-heal. Swords Dance boosts yourself, Grassy Terrain functions as a boost to your Grass type moves. Ogerpon is noticeably less tanky than other Pokémon you’ll see here, so you’ll have to be more aggressive with him. With basically all of these builds I encourage splitting half of your EV investment between special defense and defense, but that’s especially true with Ogerpon.
Landorus-Therian
Landorus-Therian is powerful, but suffers from low physical defense. Fortunately, Bulk Up can prevent this. He has very high physical attack, boosted by his moveset:
- Bulk Up
- Earthquake
- Mud-Slap
- Swords Dance
That’s a typical moveset, except for the inclusion of Mud-Slap. I recommend starting off with one or two hits of Mud-Slap in each raid so that you just don’t get hit as much. It’s a simple strategy, and it builds up your orb charge. Unfortunately, Landorus-Therian suffers from having a double weakness to Ice and a weakness to Water. This isn’t usually a problem, but Ice and Water moves are kind of randomly distributed, and you don’t really see them coming until they’ve already hit you. But as you’ll see with the other Ground type attackers, the strategy is really simple: boost your stats and then hit with Earthquake.
Regirock
Regirock is another Body Press user. Regirock has an obscene defense stat of 200, and also has access to:
- Iron Defense
- Drain Punch
- Body Press
- Sleep Talk
Sleep Talk is an optional move slot: I use it in case he gets put to sleep. Although Regirock is a Rock type, limiting his same type attack bonus from using Body Press, his extremely large defense stat combined with Iron Defense, and Body Press means that you won’t miss it much. Keep him as Rock Tera type or use Stellar, because you don’t want to be changing your type weaknesses in the middle of the raid.
Also, give him the Impish nature instead of Adamant, as his Defense stat is what’s important here.
Single Strike Urshifu
Single Strike Urshifu is an acceptably strong Dark type attacker, whose unique moveset allows him to bypass defense boosts that the opponent applies to themselves. That’s because Wicked Blow is a critical hit, and critical hits bypass defense boosts. Urshifu has:
- Swords Dance
- Wicked Blow
- Taunt
- Crunch
Taunt is optional, but recommended, because Taunt has situational usefulness that you don’t expect until it helps you. Urshifu is a glass cannon: his defense and special defense stats are pretty low even when boosted, and if he’s dying it’s going to be to special defense moves.
Rapid Strike Urshifu
Rapid Strike Urshifu is somewhat similar. Rapid Strike Urshifu runs:
- Waterfall
- Swords Dance
- Surging Strikes
- Taunt
In both of these movesets, you see their signature move of their type, and also a secondary move of that type – that’s because we want the Pokémon to be able to attack even after they’ve run out of PP. I know it seems unnecessary now, but just wait until you need it.
Groudon
Groudon is our other good Ground type attacker, but he suffers from the same issues that Landorus does. The strategy is the same:
- Earthquake
- Bulk Up
- Swords Dance
- Sunny Day
Do note, however, that it’s missing Mud-Slap. Mud-Slap itself does not make that much of a difference between the two that Groudon is better: really what it is is the fact that Groudon is more reliant on setting up with Sunny Day. Having Sunny Day limits his Water weakness, so it’s a trade-off: Groudon is weak to Grass but not so much to Water.
Calyrex-Ice
You get precisely one great physical Ice type move in this stinking game, and that’s Glacial Lance. Calyrex-Ice is your only real option for Ice type attackers (Kyurem’s a bust), and fortunately he’s a good one. Calyrex-Ice runs:
- Glacial Lance
- Iron Defense
- Icicle Crash
- Swords Dance
and typically puts all his EVs into Sp. Def, because Iron Defense will boost Def like crazy. With maximum Attack and Sp. Def investment you’ll have an unboosted 471 attack on top of Glacial Lance. Your only downsides are being Ice and Psychic type, which are easily hit super effectively in raids. Still, he’s often good enough to overcome super effective hits thanks to Iron Defense and the investments.
You could also run Snowscape instead of the less consistent Icicle Crash, but know that you’re only getting 8 shots with Glacial Lance so there’s really nothing you can waste here.
Palkia
Palkia’s the solution to many raids where Water, Ice or Fire-type attacks are the problem.
Palkia runs:
- Liquidation
- Rain Dance
- Bulk Up
- Aqua Ring (could also run Chilling Water, Thunder Wave)
Palkia is pretty close to having it all. He’s a bit light on the damage output side of things, but otherwise he can fight weather wars, set his own version of Leftovers through Aqua Ring (though Switch 1 users be aware – the animations take longer, and by setting Aqua Ring you’re taking off probably 30 seconds of time from the raid), and otherwise stat boost as needed. Palkia’s easy to play, just use three or four Bulk Ups, set Rain Dance, and start whaling away.
Palkia is perfectly fine as a Dragon-type, but his moves are better on the Water side, and there’s plenty of options to tackle Dragon Tera Types as it is already. Still, Dragon Palkia runs:
- Dragon Claw
- Bulk Up
- Aqua Ring
- (discretionary)
You might run Thunder Wave or Breaking Swipe in that last slot. Chilling Water and Breaking Swipe both knock off an Attack stage from the opponent.
Meloetta – Pirouette
Yes, it’s Drain Punch spam. But there’s a twist! The twist is inconvenience. Meloetta has to use Relic Song first to become her Pirouette form, changing her type from Normal/Psychic to Normal/Fighting. Your Tera stays the same, so make sure it’s Fighting beforehand.
Otherwise, Meloetta runs:
- Drain Punch
- Swords Dance
- Relic Song
- Discretionary
Meloetta has so many potentially useful moves that I’m not going to tell you what to run for that fourth slot, you can pick just about anything and make it work. Skill Swap? Yep. Thunder Wave and screens? Got ’em. Meloetta’s got a vast selection of utility moves for that last slot.
The gameplay is otherwise normal – Swords Dance, then Relic Song when it’s switchin’ time. Then Drain Punch until the cows come home.
A Tier – Physical
Ceruledge
Ceruledge runs:
- Bitter Blade
- Swords Dance
- Taunt
- Iron Defense
Ceruledge is a bit more frail defensively than I’d’ve liked, but he makes up for it with Bitter Blade being fantastic and by Iron Defense’s Defense boost, allowing you to invest fully into Sp. Def. He’s pretty straightforward – drop Swords Dances and, if needed, an Iron Defense, and whale away. He has some flexibility to hold options besides Shell Bell thanks to Bitter Blade’s lifesteal ability, so I recommend Life Orb or Big Root. Life Orb’ll get you more damage at the cost of losing a few HP at the end of the turn, but Big Root will gain you back more HP. Life Orb is probably better.
Metagross
I won’t lie to you, Metagross is kind of an annoying build to run. Metagross runs:
- Hone Claws
- Heavy Slam
- Iron Defense
- Iron Head
Metagross is irritating because instead of Bulk Up you get Hone Claws, which only boosts your Attack and your… accuracy. Great. Additionally, Heavy Slam is less effective on heavier Tera raid opponents, so you’re not going to know whether it’s better to use Heavy Slam or Iron Head unless you do that math beforehand. Just FYI: if they’re under 404 lbs (183 kgs) you’re going to use Heavy Slam.
Also, fair warning: Iron Head doesn’t cause flinch in Tera Raids. Right? I wasn’t happy either.
Mew
Mew is a Pokémon that certainly could use multiple loadouts, however for convenience sake I’ve only included the Psychic type one here. Mew can run:
- Psychic Fangs
- Psychic Terrain
- Bulk Up
- Any other move you feel appropriate
The strategy is very straightforward: Bulk Up, drop a Psychic Terrain, then hit with Psychic Fangs. He doesn’t do as much damage as some of the other raiders in A tier, but he’s more survivable and safer.
Iron Hands
Iron Hands is one of the most overhyped physical attackers out there regarding his Belly Drum moveset, but extremely potent when not running Belly Drum. Iron Hands in most online Tera raid content is well celebrated for his ability to one hit KO 5-star raids when super effective. Good for him! That doesn’t really fly here in 6-star raid land. We’ll get to Belly Drum stats later, but for now know that Iron Hands is far more survivable and successful when going off of one of these loadouts:
Fighting Iron Hands:
- Swords Dance
- Drain Punch
- Electric Terrain
- Discretionary – Iron Defense, Close Combat, Sand Attack are all functional choices
Electric Iron Hands:
- Swords Dance
- Electric Terrain
- Thunder Punch
- Discretionary – Iron Defense, Wild Charge, Sand Attack and Charge are all functional choices
Iron Hands’ game plan is straightforward: gimme two Swords Dance and an Electric Terrain (regardless of which type you’re running, you need that boost, and it counters Sleep as well), and start hitting with the type effective option. I don’t encourage the “drawback” moves like Close Combat or Wild Charge, especially not Close Combat given its Defense drops, but they will often heal you for more HP than you’d lose in using them.
I explain why Belly Drum is comparatively ineffective later, but for now just know that you’re taking a large risk with Belly Drum to get a slightly faster KO, and on average you’ll die more often than it’s worth to run Belly Drum.
Body Press Strategies
Please see the Zamazenta section in the S tier for a rundown of Body Press strats.
Garchomp
Groudon, but not weak to Grass or Water (until he Terastallizes, at least). That’s the sales pitch for Garchomp. Oh, and gambling. That’s the other sales pitch.
Groudon runs:
- Earthquake (Dragon Claw if running Dragon)
- Swords Dance
- Sand Attack
- Sandstorm
See, Garchomp’s ability Sand Veil boosts his evasiveness in a sandstorm, and Sand Attack lowers the opponent’s accuracy. With Sand Veil up and a Sand Attack against the opponent, you can reduce the odds of a 100% accurate move to a 66%ish percent, giving you the occasional freebie. He’s got plenty of HP and acceptable defensive stats, and nearly 400 Attack when maximally invested plus Swords Dance, so as long as he’s not getting hit with an Ice type attack (which are rare in Tera Raids anyway) he’ll actually be pretty darn strong. He’d be pretty good even without the evasion, but the evasion just adds to the mix.
You can swap Earthquake for Dragon Claw, but the loss of 20 base power doesn’t do it any favors. It’s doable, though. The Dragon Tera also changes the list of vulnerabilities when you Tera, so you do have options there.
Kingambit
Supreme Overlord doesn’t work with Tera raids as far as I can tell (though that’s admittedly hard to test) but Defiant does carry a lot of water for Kingambit. Kingambit’s a typical stat-boosting user, who runs:
- Kowtow Cleave
- Swords Dance
- Taunt
- Iron Defense
Kingambit has a beastly 405 attack stat when fully invested, and his only real hangup is his low speed and Sp. Def. Otherwise, he’s a straightforward loadout and comes with Taunt, to boot. Defiant is also a great option for physical Tera raiders, because it functions like a free Swords Dance when you least expect it. Shadow Ball proc’d a Sp. Def drop? Swords Dance on the house! Chilling Water knocked off an Attack stage? Take two back! He sets up and sets up quickly in those raids.
Just… stay away from Fighting-types.
Okidogi
Okidogi is your option for Poison type attacks, unless you want to go over to the special side. Even then… not much in the way of Poison. You could always run Seviper instead!
Okidogi runs:
- Bulk Up
- Poison Jab
- Taunt
- (discretionary)
The strategy is straightforward: run Poison Jab and Bulk Up ad infinitum. Taunt if you need to. Terastallize when you can. The only real hitch is what to run for that fourth move. I chose Sleep Talk, because there is nothing else to use it for. You can try Toxic, but Poison is the most useless status in Tera Raids, and Toxic Chain means you’ll likely get a poison on them anyway. You can go for Curse or Howl, but that doesn’t do anything for you that Bulk Up won’t. At least Sleep Talk takes care of Sleep, which is a pain-in-the-arse subgroup of Tera Raid strats.
Arceus
The special tier list has Arceus-Grass, and the physical one has Arceus-Normal. Yes, he’s holding Shell Bell.
Arceus runs:
- Body Slam (see note)
- Swords Dance
- Cosmic Power
- Misty Terrain
Body Slam versus Normal Judgement is a trade-off. Judgement has fifteen extra base power, but Body Slam has a 30% chance to paralyze. Both are functional, but if you’re not the type to check when the mid-raid stat wipe is and instead just drop two Swords Dances and start hitting, then Judgement is probably better for you. Body Slam is generally more impactful if you can plan for the stat wipe and Swords Dance accordingly.
Also, yes, I know Arceus can’t be super effective against anything. However, he’s still pretty functional and is probably the only Pokemon to really effectively break the “try to be super effective” philosophy. Think of it like this: Cosmic Power makes him unkillable, Misty Terrain makes him unsleepable, and aside from Rock and Steel he has a shot against every type. Why not build one?
Swampert
Swampert Water is A tier, Swampert Ground is… significantly less helpful. Aside from an immunity to Electric, Swampert’s not defensively impressive out of the gate. Don’t even think about mowing your lawn near a Swampert, because one blade of grass will kill him. Still, he double resists Water, resists Ground and Steel, and does run Bulk Up and Amnesia, so he can get a decent defensive profile going if you give him a turn or two. Be sure to invest in Sp. Def and Attack exclusively so Bulk Up can do the rest.
Swampert Ground runs:
- Earthquake
- Bulk Up
- Amnesia
- Screech/Chilling Water
Bulk Up and Earthquake are the only two mandatory moves for this build, but Amnesia and Screech don’t hurt to add so you can solve the defensiveness problem. Once he gets going, he actually gets going pretty well, but his reliance on defensive stat boosts renders him really vulnerable to mid-raid stat wipes, and that’s not a great thing to be vulnerable to. Chilling Water does help with that, if need be.
Swampert Water runs:
- Liquidation
- Bulk Up
- Chilling Water
- Rain Dance/Amnesia
Swampert was truly designed for Water-type attacking, thanks in no small part to his ability Torrent, which gives Water attacks a boost when he’s low on HP. This’ll help you recover when you’ve been beaten within an inch of your life. More specifically, within 1/3rd of your life. Swampert Water will often toss at least one Chilling Water to the opponent to build up Tera and drop their Attack stat, then a Bulk Up or two as needed, and finally a Rain Dance if he’s not busy dying. You can swap out Rain Dance for Amnesia if you need the defense.
The end result of all this is a surprisingly competent Water-type attacker who can drop Attack stats through the Tera shield and play weather wars fairly competently.
Glastrier
Jimothy Cool would be proud. Glastrier shook off Calyrex and is now his own man, hitting extremely hard with Ice-type Icicle Crash and making himself a physical tank without equal (besides his equals). The Horse Council is in good hands.
Glastrier runs:
- Swords Dance
- Icicle Crash
- Iron Defense
- Taunt
Of course, put all your investment into Sp. Def and Attack because Iron Defense will cover your butt on the Defense. Glastrier’s very, very, very slow so expect that he’ll move last in every circumstance, and he has no answer for special attackers whatsoever, so he’s hanging out in A tier.
B Tier – Physical
Belly Drum Strategies
Belly Drum strategies are very overhyped when it comes to solo six-star raids. In online raids they’re much more successful because teammates who know how to support will often recognize the Belly Drum strategy and use cheers appropriately, and so long as other teammates don’t immediately die (they often do) then you’ll at least get your Belly Drum attack off. However, Belly Drum presents an inherent problem: after you’ve cut your HP in half, you’re exceedingly vulnerable. Depending on whether you out speed the opponent, they might get to attack twice before you even drop your attack. So if you’re not using Belly Drum on a four-hit KO Pokémon, you might just die. And if you die, you take the raid out with you. So I don’t recommend Belly Drum strategies unless you’re coordinating with a teammate – which is not the scenario that this tier list is designed for anyway. As a result, I’ve placed most Belly Drum kits in B tier because they’re simply too risky to be your first choice.
Azumarill
Azumarill runs basically the same option regardless of which type you want to use: holding Shell Bell, he will run Aqua Ring and Belly Drum. Then, if he’s running Water type attacks he will run:
- Rain Dance
- Aqua Tail
- Aqua Ring
- Belly Drum
But if he’s running Fairy type attacks he will run:
- Play Rough
- Aqua Ring
- Belly Drum
- Fourth move slot open for your decision
Azumarill benefits from Huge Power, which is an automatic doubling of his attack stat. However, he suffers from the same drawbacks that a typical Belly Drum user suffers from, so I don’t recommend him over the other Water and Fairy type alternatives.
Slither Wing
Slither Wing is a Bug type attacker I’m especially proud of, as I came up with this move set without inspiration or observation from anyone else. Slither Wing should run:
- Leech Life
- Bulk Up
- Sunny Day
- Stun Spore
Because he has Protosynthesis as his ability, setting a Sunny Day boosts your attack, which stacks with Bulk Up and his already high physical attack, resulting in Leech Life being a great way to self-heal. Actually it’s a phenomenal way to self heal! And of course, you have Stun Spore available if you need to buy some time with paralysis. Do bear in mind that because he is Bug and Fighting type, he’s double weak to Flying and has a handful of other type weaknesses, so he’s not your best option when fighting Psychic and Dark and Grass raiders in every circumstance.
Great Tusk
Great Tusk is our forgotten stepchild of a Ground type attacker. Like the Ground types, Great Tusk runs:
- Earthquake
- Bulk Up
- Sunny Day
- Taunt (recommended for open third slot)
Great Tusk is simply inferior because, like Groudon, he has to run Sunny Day and should set that up before attacking. He’s also just a bit more glassy, and can’t take as much of a hit as the other two. Actually, his special defense is so low that I recommend you put your EV investment into his special defense instead of his physical attack. He also has far worse typing, being weak to everything that Ground is weak to and also everything that Fighting is weak to.
Galarian Zapdos
Galarian Zapdos is a moveset that I really had to force to work together. Galarian Zapdos runs:
- Bulk Up
- Drill Peck
- Taunt
- Fly or Tera Blast
That’s not a great moveset, but it’s about as much horsepower as we can get out of him. Honestly, instead of running Fly you might just run Tera Blast to not have the turn skip. He’s a bit of a glass cannon especially because of his bad typing, but he’s also your only real option for Flying type attacks. Flying type Physical attack is otherwise nonexistent in Tera Raids insofar as I can make a Flying type build work.
Shaymin
Shaymin’s weird, man.
- Swords Dance (or Growth)
- Petal Blizzard
- Grassy Terrain
- Discretional (I use Giga Drain)
Shaymin basically has two builds: all physical, or the only physical and special build in the game thanks to Growth. The double-attack moveset uses Growth and Giga Drain and still focuses on Petal Blizzard, but can hold something besides Shell Bell much in the same way Ogerpon can with Horn Leech. The problem is that Shaymin doesn’t have that much attack output without Swords Dance. So the Swords Dance + Petal Blizzard and Shell Bell moveset is faster but doesn’t self-heal as much, while the double-attack moveset self heals a lot more but isn’t as offensive, and so may not do enough damage to beat the timer. Up to you how you want to run it.
Iron Leaves
On paper, you’d think Iron Leaves would be pretty great. High Attack stat, high Sp. Def, easily boostable Defense, Electric Terrain to block Sleep, Swords Dance, etc. These all look like the ingredients for a great and flexible raider. And he’s not a bad raider! But he’s not playing at the level you’d think he’d play at. I can’t figure out if it’s what I’m using for the build, if I’ve just had bad luck in testing, or if he’s actually being held back that much by his typing. Yes, that’s right – his Grass/Psychic typing isn’t doing him any favors, as he doesn’t resist very much and most opponents that have moves he resists also have moves that he doesn’t. Additionally, he takes an extra turn or two to set up against most opponents because of his low Defense. Iron Defense can mitigate a lot of that, but not all, and the cost of an extra setup turn does actually matter.
Still, Iron Leaves runs:
- Swords Dance
- Electric Terrain
- Leaf Blade
- Iron Defense
If you’re playing against a physical attacker, all you really need is a single Iron Defense and then you’re fine to set up the rest of your build with Swords Dance, Electric Terrain. Iron Leaves doesn’t sweat much against exclusively physical attackers, or against sleep inflicters for that matter. It’s just special attacker opponents he has a hard time with, and for that reason I have him in B.
C+ Tier – Physical
Kleavor
Kleavor is your other Bug type option, though I don’t like him as much as I like Slither Wing. Kleavor runs:
- Double Team
- Light Screen
- X-Scissor
- Swords Dance
Basically the entire time that you’re running Kleavor you’re praying not to get hit by a special type move: that’s why you run Double Team and Light Screen. His special defense is bad enough that a single super effective hit can sometimes end your entire run. Problem is, he’s Bug and Rock type, which is not what one normally calls “a great defensive type”. Still, if he’s not being hit super effectively and he’s given the room to set up two Swords Dance and a Double Team, he can pull it off.
Terrakion
In the rare instances where Terrakion isn’t getting hit super effectively, he’s frail enough defensively that he’s going to wish he wasn’t there at all. Terrakion’s the Pokemon you wish was useful, as he has an absurd Attack stat and access to Swords Dance, and if you’re facing an opponent who isn’t super effective nor do they have special attacks, you’ll probably be alright. But if not… ouch.
Terrakion runs:
- Swords Dance
- Rock Slide
- Reflect
- Tera Blast
Terrakion suffers from Rock Slide being his best pre-Tera Rock type option. Rock Slide is 90% accurate, which means you’ll miss it right when you are about to charge your Tera Orb. If you manage to survive long enough to Terastallize, Tera Blast does save your butt. Terrakion and Iron Thorns would be totally useless if they weren’t just about the only tolerable physical Rock type options on the playground.
C Tier – Physical
Iron Thorns
Iron Thorns is one of the worst still-viable raiders that I’ve ever found, and the only reason you should build him is because of his Rock type potential. Iron Thorns runs:
- Swords Dance
- Rock Slide
- Electric Terrain
- Tera Blast
He has some of the worst typing in the game, being double weak to Ground and weak to Water, Fighting and Grass. Good luck not being hit super effectively. However, if that is the case and you’re not going to die within three turns, you have a bit of room for setup: you can start with Swords Dance, Electric Terrain and lastly start hitting with Rock Slide. Unfortunately, Rock Slide is only 90% accuracy, so you’re not going to be doing a lot with that either, and you run the RNG risk that ruins so many other builds. Much like Terrakion, Rock Slide is just there to charge your Orb until you can Tera Blast.
This goes without saying, but… if Iron Thorns isn’t super effective, don’t run him.
Zarude
Zarude is just baaaaaaarely viable enough to include on this list, and that’s really just in optimal conditions. Zarude is a weather warrior, relying on Sunny Day to maximize his damage output. Problem is, as soon as the weather changes away from sun he’s crippled. Zarude runs:
- Sunny Day
- Solar Blade
- Swords Dance
- (discretionary)
Basically, you drop x3 Swords Dance, or as many as you can until it’s time to start self-healing, make absolutely certain that sun is set up, and hit Solar Blades. If you’re doing that, you’re smoothly sailing. Even with all that though, you’re reliant on both the sun and on not being hit particularly hard.
Maybe there’s a better build for Zarude, but I can’t seem to find it.
Ogerpon (Water)
You were so preoccupied with whether you could, you didn’t stop to think if you should. Ogerpon Water strips the Shell Bell in favor of the Wellspring Mask, relegating Ogerpon’s self-healing ability to Horn Leech. That severely truncates its usefulness. Still, Water Absorb is a tremendous asset against some raids (looking at you, Politoed).
Ogerpon (Water) runs:
- Horn Leech
- Ivy Cudgel
- Swords Dance
- Rain Dance
The basic idea is that while Ivy Cudgel is a Water-type move now, Horn Leech remains a Grass-type move, so the only types this build is doubly super-effective against are Ground and Rock. Make no mistake, you don’t want to use this build against anything that resists Grass-type Horn Leech. If you do, you don’t have a way to self-heal particularly well. Ogerpon’s not very defensive either, so shrugging off hits just doesn’t happen. Oh, and your defensive profile changes completely when you Tera, going from a weakness to Flying, Poison and Bug to a weakness to Grass and Electric, so be aware of that as well.
Seviper
I need you to understand that this is objectively the funniest Tera Raid build I have ever contrived, and the fact that this build sometimes works extremely well pleases me to no end. Seviper’s actually a fantastic Tera Raider subject to a few conditions:
- As always, he’s not being hit super effectively
- He outspeeds the opponent on Turn 1 or at least doesn’t take a hit
- The opponent is not especially aggressive with stat wipes
“Gee, Doc. Why those specific conditions?” you’re asking yourself, voice trembling in anticipation. Seviper needs each of those conditions because he has access to both Swords Dance and Stockpile. Stockpile is basically a stand-in for Cosmic Power, and if he can drop a Stockpile before the opponent hits him, he’ll sometimes have enough freedom to set up a Swords Dance and start self-healing. If he doesn’t meet all three conditions, he’s toast. And if he happens to get statused, he has Shed Skin, which has a 1 in 3 chance of wiping any status at the end of each turn. It’s not consistent enough to make Seviper a good choice in Sleep raids, but hey… at least it’s there.
Seviper runs:
- Stockpile
- Swords Dance
- Poison Jab
- Gunk Shot/Scary Face/Breaking Swipe
The strat is to hit a Stockpile to make sure you don’t die, and two immediately if you’re not going to have your stats wiped. Remember, you can only use Stockpile three times in the entire raid. But if you have two, then your defensive stats should be acceptable enough that you can self-heal with Poison Jab. In my discussions with other Tera Raid nerds they all suggested using Coil. I strongly recommend not using Coil, as while it’s basically a version of Bulk Up, you already have Swords Dance and Stockpile! The only difference between two turns used on Coil versus a turn on Swords Dance and Stockpile is that Coil doesn’t get you a Sp. Def boost, but does get you a bit more Speed and Defense. The trade-off is that with Stockpile you’re useful against Pokemon with special attacks… which is nearly all of them.
Gunk Shot versus Scary Face is a tricky one. Seviper’s risky enough that having the speed advantage early on might be a big deal, but Gunk Shot is a very powerful move, if not also a gamble. Breaking Swipe is decent as a way to limit the effectiveness of a physical attacker, should you want to be a bit cautious with how you use your Stockpiles. I run Gunk Shot, but Breaking Swipe is just as good of an idea.
The wild thing about Seviper is that he’s the only Pokemon in this tier whom I can say actually doesn’t need to be super effective to win subject to those three conditions. Judicious use of Stockpile and knowing the Speed stats going in can often mean Seviper is, hilariously, useful in raids, and that’s just awesome. So in some ways he doesn’t deserve his C tier placement at all.

Wow you have done a lot of Tera raids
LikeLike
Probably too many, to be honest. I did the last 2,000 just for the purpose of ranking builds (took me *months*)
LikeLike
some top-tier special attackers you don’t have at all (I would put them with Gholdengo/Miraidon/Arceus and everything else would be at least a tier below them):
Pecharunt (Acid Spray/Nasty Plot/Malignant Chain/Venoshock) pretty much ignores the type chart when it comes to tanking physical attacks, even more so when you can Tera ASAP and lose the weakness to stuff like Crunch/Night Slash
Espathra (Calm Mind/Lumina Crash/Stored Power) with Speed Boost burns through stuff faster than other Stored Power users to make up for not having legendary base stats. If you consider Acid Spray the best move in the game, well Lumina Crash has 2x the base power and of course has a better matchup against a lot of types that resist Poison. A bunch of moves like Reflect/Light Screen/Feather Dance/Mud-Slap/Roost in the last slot can help Espathra survive and stack up boosts easier.
Iron Moth (Acid Spray/Electric Terrain/Sludge Wave/Fiery Dance) stays alive better than you’d think because it has the hardest-hitting Tera Acid Spray in the game and heals plenty just from that. It also has both Lunge and Struggle Bug to take hits even better.
for physical attackers, the crit chance boost from Focus Energy lasts for the entire battle so Annihilape (more like Bellibolt level) and Iron Hands (it and Koraidon are the two best after Annihilape) are underrated.
Annihilape’s generally much worse at doing Fighting damage than Koraidon/Iron Hands but when Ghost is neutral its main competition is often a different build of itself. You can go full HP/Special Defense and/or just attack from the start (Low Sweep/Bulldoze I’ve found more useful than Drain Punch to get some speed control and charge Tera before Rage Fist is powered up) to become pure Ghost ASAP.
on Koraidon I really like Breaking Swipe where it helps you tank hits just as much as Bulk Up but gets you ready to ditch the Dragon type weaknesses sooner. SD/Breaking Swipe/Drain Punch/Collision with Black Belt is my main build where I very rarely find I need a Body Press user against physical attackers because Koraidon is bulky enough with no boosts and obviously gets more healing from Drain Punch than a Shell Bell Body Press user gets
LikeLike
pecharunt I’ve experimented with and while he’s a physical tank, he’s not defensive enough on the special side. I do have a pecharunt build on the other page but I’m revising it before I put it on this tier list
espathra’s not bulky enough to survive most 6-star raids, she can counter it somewhat with proper EV investment and calm mind, but it’s not enough to be worth placing on the tier list. i’ve tested her extensively in the hopes of properly placing her and she just doesn’t have that kind of power level that i can get out of her. could just be me, but i think it’s more likely that she’s just not fit for the endurance required in a 6-star raid
ditto with Iron Moth, far too frail in many cases. Lunge and Struggle Bug are off-type and thus aren’t viable compared to his main options
I’ve gone back and forth on where to place Annihilape Fighting and Ghost, because of his extreme damage output, but they’re not defensive enough to come to the level of Bellibolt imo.
Drain Punch annihilape is the best because of DP being OP at survivability
breaking swipe is a great move, yeah. the Koraidon build options are pretty broad so there’s plenty of leeway in there
LikeLike
Pecharunt has 88/88 special bulk, you can invest fully in it and be specially bulky while still being a physical tank. Going 252 HP/Sp. Attack is only necessary if you want to power through something like Excadrill that has super-effective STAB. You probably weren’t using Venoshock on it where inflicting poison is reliable enough and with a high base power move you can get consistent damage/healing without needing to first stack up a bunch of stat changes in your favor. I very rarely even use Nasty Plot on it unless it’s against something that’s wiping debuffs after the first turn; it’s far better to just Acid Spray from the start and then proactively use Malignant Chain (don’t have to worry about PP nearly as much when you have a stronger attack to switch to) whenever it will get you back to full health since the status will get you the occasional free turn plus basically act as an additional Acid Spray damage-wise by opening up a 130 BP move. There are so many things where if you just attack from the start, some Dark/Ghost type attack is no longer nearly the problem you’re making it out to be because you’re no longer weak to it by the time the initial defense cheer runs out.
Espathra you are definitely underestimating how much damage you can rack up when you have a proper build for it, I have beaten a Psychic Metagross with half the timer remaining despite hitting for not very effective damage; it’s in the same boat as Pecharunt where if you’re worried about survivability you can just do full HP+Defense or special defense EVs because your damage output is never a concern. Far more often than how much damage it takes (not much when you take the simple step of having one build to set up on physical attackers and one build for special attackers) the problem is being vulnerable to every type of status, which is no different from stuff like Kyogre, Enamorous, Terapagos, other psychic types, etc. where like Terapagos will be on the verge of running out of time against stuff that doesn’t come close to KOing it if you get fully paralyzed a couple times or have to use a couple heal cheers to clear status. I would say Espathra has more tools for survivability than Gholdengo anytime you’re against something that actually attacks Gholdengo.
Stored Power is pretty incidental on Espathra where you can just get one Calm Mind at the beginning of the battle to take special hits better/give you more healing while you spam Lumina Crash, and then you just passively build up to a 140+ base power move in your back pocket if you need to heal back to full or get some good burst damage before the debuffs get reset. The bulk difference between like Espathra and Mew is overcome pretty quickly when non-STAB Acid Spray is not healing anything compared to how Tera boosted Lumina Crash allows you to heal, do damage, and debuff all at once. It would be 7 star raids where the bulk starts to be lacking for Espathra, otherwise it is really not taking much from unboosted Night Slash/Shadow Claw type moves when you have the level advantage, the right EVs, and can give them -2 attack yourself while setting up.
Iron Moth very rarely needs to deviate from Acid Spray and Sludge Wave where it’s pretty easy to heal back more than what you take. Stuff like Leafeon, Amoongus, Torkoal, Glaceon, Umbreon, Avalugg, Scizor, Mimikyu, Sylveon, Maushold, Revavroom, and Leavanny it’s often the #1 pick against even if Poison is only neutral, and the stuff it struggles against you’d rather have a physical attacker than a special attacker anyways. Defensively there are a lot of matchups where residual poison/burn damage end up being more of a concern than the opponent’s actual attacks, and Moth is immune to both while also being able to boost itself in the process of working around sleep; double resisting Grass comes in handy a bit too where there’s stuff that can really hit hard against resists with terrain up and multiple boosts from Swords Dance or multiple debuffs from it spamming Energy Ball against you. The opponents it struggles against is stuff that physical attackers are better against than special attackers, and that works in the opposite direction where Iron Moth dominates Fairy types/teras that give the top tier fighting types problems while not caring about burns and also being way better at damaging Bellibolt resists like Grass or Dragon.
The commonality between these three special attackers where the debuffing move does a lot more damage/heals you more, so you’ll get situations when the debuffs get reset while the shield is up and Tera boosted Acid Spray/Lumina Crash 2x will be enough to break it from there while giving you consistent healing as opposed to costing yourself long-term damage/healing because you have to switch from Acid Spray over to the stronger STAB move sooner.
Annihilape once again you can just do full Special Defense EVs and you don’t need to more than 1-2 Bulk Ups (or 1 Bulk Up + 1 Focus Energy is almost always even better than 2 Bulk Ups) to get to the point that you can just Rage Fist the rest of the battle and will heal more than you take. When you’re Tera Ghost it doesn’t take long to get to the point that Rage Fist is healing more than Drain Punch anyway. There are so many weak Psychic/Psyshock/Extrasensory/Dazzling Gleam type of coverage moves that barely tickle it as Tera Ghost, and there’s no rule that says you can’t just throw out attacks to start the battle and then wait until you’re Tera to go for boosts.
There’s not really a point in using Drain Punch on Annihilape unless it’s a super niche situation where you’re abusing Defiant against something that’s Dark or Normal and can run Metronome or something. Again since Focus Energy lasts the whole battle there’s lots of defense boosters/attack droppers where Annihilape is the best physical option, in addition to all the sleep users (or even Haze Poliwrath) it’s head and shoulders above everything else against.
The main thing is you’re just sleeping on full defensive investment on stuff that has multiple ways to boost its damage in the long term. Bulk in raids is not a continuous thing where having an additional however many points in defense is always x% better. Instead there are thresholds where if you’re 3HKOed rather than 2HKOed the AI will use some status move on you rather than a damaging attack and that free turn where something like Espathra is taking the same 0% damage as Arceus or whatever is more than enough to snowball.
All that before mentioning how unlucky you have to be to get zero help from NPCs against physical attackers; this is another thing where you’re sleeping on Venoshock where if you somehow don’t have a physical attack debuffer, odds are you do have something like Toxapex or Clodsire that can inflict poison when the shield goes up. Merciless Toxapex also becomes top-tier when poison is in the picture (easy enough against many physical attackers via Baneful Bunker), a crit Shell Bell Venoshock is doing as much damage as a Judgment from Toxic Plate Arceus while also of course healing.
LikeLike
I’ll keep an eye on Pecharunt. I’ve tried him previously and found that Venoshock was unreliable enough that it wasn’t worth running, as NPCs would inflict statuses often enough that it would ruin the entire raid – if you can’t get the Poison, you’re basically toast.
Hard disagree on the special bulk, that’s not enough for a Pokémon that doesn’t otherwise have a way to raise it. I’m planning to reevaluate Pecharunt in the coming weeks anyway so I’ll incorporate your suggestions.
I don’t plan around having certain specific NPCs available, as that’s far too RNG-heavy to be worth the time. I’m of the opinion that a Tera Raid strategy should be weighed against the worst case scenario, as the worst case scenario is often what happens in raids.
Psychic Metagross is one of the easiest raids, I’m not sure I’d use that as a sole source. As a matter of philosophy I always maximize my attack, because hitting 10% harder means you have to survive two fewer turns per raid, but I’ll deviate from the norm with Espathra and see if it works. I’m skeptical, especially given his absurdly low defensive stats, but it’s worth a shot. Mostly I’m curious about that hybrid Lumina Crash/Stored Power build you’ve suggested, as I’ve avoided Stored Power builds because they’re all the same type and strategy.
I think we have a difference in philosophy. I build so that your likelihood of success is as high as possible. Risky, frailer builds like Iron Moth that can be picked off with two to three attacks don’t cut it. I’m reading your comment as largely agreeing with my base assumption – that being super effective is better – but Iron Moth’s weak Defense is enough to rule it out from any raid that runs a physical move in my book. Like Pecharunt, I was considering giving it another try anyway, but I’m not optimistic.
Acid Spray is a GOATed move, yeah. It’s good enough to carry a lot of special attackers. But I’m not sure I understand what you mean in the “commonality” paragraph – are you indicating that you sometimes just spam Acid Spray even after it’s had its maximum effect?
Annihilape’s going to be good with a whole bunch of its moves, and it depends on what Tera you’re running anyway, so I’d imagine it’s not much use quibbling over which one’s the best.
Regarding defensive investment, bulk is a benefit in every case where you are able to produce enough DPS to win the raid. If you can meet that DPS, then your only concern is staying alive long enough to do it. So you maximize your Attack to ensure you hit that DPS, and then everything else goes into Sp. Def or Def, easy.
LikeLike
The commonality is that when you have Tera + STAB further multiplying it, Acid Spray/Lumina Crash are elevated from moves that are used simply to apply a debuff/charge Tera to moves that provide substantial damage and Shell Bell healing even when the shield is up. It’s easy to forget that Acid Spray also gets a base power boost when Terastallized because if you’re not Tera Poison it’s doing a tiny sliver against the shield either way and things like Bellibolt and Arceus generally aren’t holding Shell Bell for you to see any difference in healing. Espathra further multiplies this where it’s double the base power and has a better type effectiveness against every type that resists or is immune to Poison.
Obviously there are times where healing ‘only’ to like 80-90% rather than 100% is a negligible price to pay to get another debuff in (which increases your long-term damage/healing), whereas other stuff has a much stricter trade-off where it’s either a debuff and no damage/healing or damage/healing and no debuff. This is even more pronounced when the shield is up since it’s better to do just enough to break the shield with Acid Spray/Lumina Crash and allow your next hit to be significantly stronger than it is to have to switch to your stronger move, have its damage gated, and not have that additional debuff when the shield is down. This is especially big because a lot of opponents will pull out an extra attack or stat boost clear or stat boost of their own once the shield is broken, and in that position the most foolproof way of staying healthy against them is just getting an extra big hit that has a much better chance of either KOing or getting the opponent in range that teammates finish it off on that free turn you get.
Anyhow I trust that my approach to maximizing the probability of winning over yours, it’s just math and not actually subject to opinion. For example if you’re boosting the appropriate defense against most opponents you’ll quickly get to the point where your only chance of being KOed is though critical hits or some game-changing secondary effect, and you’re just giving the opponent more chances for that to happen if it’s taking you like 12 turns to KO the opponent rather than 8 because you need more turns of setup to do damage. ‘Endurance’ is not something you really want to be seeking out at all times when there are plenty of opponents who wear you down via residual damage/stealing your Tera charge or clearing stat changes at inopportune moments/spamming moves that can drop defense or special defense rather than because they’re taking huge chunks off of you every single turn.
Similarly it would be more discerning to note that Pokemon like Falinks and Torkoal set themselves apart from other Iron Defense+Body Press users since the strategy requires more turns for a KO than just boosting up and spamming Drain Punch with Koraidon/Iron Hands. The more aggro attack boosting opponents when you’d want defense boosting tend to have STAB moves that are either super effective against Fighting or have high crit ratios (or are Annihilape that uses Focus Energy on top of whatever boosts it gets from Bulk Up+Defiant). Really the only Body Press users with any sort of niche besides those two are Archaludon (resists most Fighting types’ weaknesses during set-up, Focus Energy obviously is great against defense boosters, Stamina + Breaking Swipe/Snarl allows it to simultaneously debuff, boost, and charge Tera) and Dachsbun (with Well-Baked Body it’s Gholdengo levels of easy cheese against opponents that use Will-o-Wisp/Fire attacks, actually even simpler where you can get by with Metronome to further boost damage while just spamming one attack the entire battle). Something like Zamazenta is stuck in between where the extra initial bulk/Body Press damage basically never helps more than the extra damage/healing of an item-boosted Drain Punch from tanks like Koraidon/Iron Hands or the crit immunity/better auxiliary movepool of Falinks. Oh and then something else that checks very similar boxes of being able to boost its defense and do damage against types weak to Fighting would be Contrary Malamar where you have a Psychic immunity, can charge Tera as you boost, and can Skill Swap/Topsy-Turvy some of the more stat boost-happy opponents that a lot of top-tier attackers have problems against.
Another straightforward example of maximizing win probability is that you do not automatically lose the raid if you faint, and in fact some matchups you’ll get a safer guaranteed win in fewer turns/with more time remaining on the timer by just using a higher damage mon and not caring if you faint because you can come back at full health and still do a bunch of damage since you’re not dependent on stacking boosts.
Again there’s so much stuff where Annihilape can just charge Tera the first three turns, and then if you’re at low health because of a crit or defense drops or something it’s better to throw out an attack/defense cheer as you faint while coming back fresh and ready to Tera than to spend multiple turns doing little/no damage trying to heal yourself back up with Drain Punch or heal cheers. Annihilape has probably been able to reliably beat even more 7 star raids than any other mon due to this kind of versatility, so you are definitely overindexing for ‘is least likely to get KOed’ as opposed to ‘is most likely to KO the opponent before the timer runs out.’ The ultimate example would be something like Ghost Annihilape which would be on the short list for most difficult 6 star mon/type combos, and one of the few mons that can reliably solo it regardless of teammates would be Annihilape just outspeeding and spamming Rage Fist where you’ll faint 3-4 times but that turn you Tera you’ll one-shot the shield and the next turn after you’re revived you’ll KO it.
The stuff that is more dependent on stacking stat boosts you only have one chance with where if you get KOed while Tera and the shield’s still up you might as well restart, but with Pecharunt/Iron Moth/Espathra/Annihilape it’s easy to lay the groundwork (via reducing special defense or building up Rage Fist BP, it doesn’t reset upon fainting) to get back in and start doing big shield damage in short order, particularly for the dual-type mons where they obviously have high damage potential and are often able to get a ‘free’ boosting turn when they Tera from full health and get a better type matchup against whatever move the opponent had targeted them with. They also have a much better matchup in general against the pool of opponents that has more anti stat-boosting measures. All these Pokemon fare much better when doing neutral damage than the vast majority of S-tier stuff – that’s pretty relevant when it comes to being viable in as many raids as possible since any given matchup will have more types you’ll be hitting neutrally than super-effective, so from a simple math standpoint if something is 95% as good when doing super-effective damage and twice as good when doing neutral damage (like looking at that ‘S tier’ Ho-oh set you have, you would definitely run out of time trying to KO stuff neutral to Fire if it wasn’t like setting up Sunny Day for you) it’s going to be substantially more useful on balance.
Also to go with your whole last paragraph, they do so much damage that they do not need any investment in their attacking stats to do enough to win the raid (even when they are just doing neutral or even not-very effective damage), and they are able to become quite bulky with full defensive investment. It’s laughable to consider something like Pecharunt lacking in special bulk when it can have 380/302 HP/Sp.Def compared to 404/316 for a Modest Kyogre with EVs in HP and Special Attack (Kyogre would have 12% better special bulk, aka the difference between Pecharunt and a cover legendary with 140 base Special Defense would be within damage roll ranges), and then it’s obviously got way higher physical defense and offensively is able to overtake Kyogre in the long run by having much better boosting/debuffing options than Calm Mind. Then if you tried to emphasize Kyogre’s special bulk at the cost of special attack you’re really cutting down on its damage/healing when its main attack by the time it’s able to Tera is Surf, which may not even have rain boosting it since you have to take however many turns setting up Aqua Ring and Calm Mind – definitely another one I wouldn’t want to take on against a neutral type matchup if it isn’t replenishing weather.
I have used specially defensive Pecharunt to great effect against something like Galar Slowking where it will give you free turns using Yawn when you’re awake and then Eerie Spell (which obviously messes with stuff that depends on one particular attack for damage/healing) doesn’t do a ton. It’s not like there are that many stronger hits it has to face given it’s STAB and super effective while targeting its lower defensive stat, and just as I already said, even that level of attacker will give it free turns using status moves rather than attacking straight away if there is not a 2HKO on the table. I mean you could even go Tera Ghost + Hex and easily win against a bunch of stuff that has Ground and Psychic attacks you’d be worried about.
You are also way off in the comment about NPCs, for starters the opponent clears status when the shield goes up and not many teammates can status at that point. Pecharunt is certainly not ‘toast’ without poison as it still has legendary bulk, Acid Spray, Nasty Plot, and a 100 base power no-drawback STAB move while being able to appreciate a burn against a physical attacker or a paralysis as much as anything else (I mean if the opponent is burned you can throw the type chart out the window because even something like Garchomp or Excadrill becomes a cinch to tank hits from while racking up more boosts/debuffs). In fact, the only NPCs that can status a shielded opponent are Bellibolt (maybe the best possible teammate for Pecharunt, sets Light Screen while Discharge on top of the paralysis chance will be doing very solid damage against opponents with reduced Sp. Def), Arcanine (Intimidate, Flamethrower again provides good chip), and Weavile (I’m definitely not turning down a freeze if l can get it lol). You just totally misinterpreted it when it was simple enough to understand that many NPCs are helpful in some way, and then with Venoshock you can turn stuff like Clodsire or Toxapex (if you’re bringing something that Poison is effective against, odds are it will be using Poison Jab instead of Chilling Water) from useless to awesome as well, which certainly cuts down the chances of going 0/3 on getting helpful teammates.
LikeLike
That’s a whooooole wall of text, and after skimming through it I’m going to say, hey… Good for you, man.
LikeLike