

by Doc – Owner, Founder, Hates Golf
If you’d like to go into more detail on Tera Raid mechanics, see this post.
Mastering the art of a Tera Raid is a lot like mastering the game of golf: while the course is fundamentally the same each time you play it, the circumstances of each play are different. The wind is different. Your clubs are different. Perhaps even your golf ball is different. And, similarly, in Tera Raids the Tera type is different, your NPC partners are different, and you have a different RNG seed. Just like golf, we can’t plan for everything, but we can get familiar with the course enough that we can strategize to win most of the time.
By the end of this piece I endeavor to have taught you everything you need to know to begin creating your own Tera Raid builds and tackling offline six-star Tera Raids. I’ll assume you’ve done some Tera Raids but don’t quite understand what is going on.
First, a few mechanics to understand about Tera Raids. I’ll present these as bullet points for digestibility.
- Tera Raids operate on a script, and that script is unique to the Pokémon that you are fighting. Some Pokémon will wipe your stats in the middle of the raid, some will use moves at certain points and some will begin the battle in a certain manner. This script will play out exactly the same in every raid. You ought to reference this script to know whether your stats will be wiped mid-raid, what types of attacks will be used, etc. and plan accordingly.
- On top of that script is the actual turn-based battle going on. The script interjects into the battle, which is why sometimes the opponent gets to move a few times in a row. The script hit a threshold causing the opponent to do something, no matter what state the turn-based battle was in.
- The most important thing to know is if or when your stats get wiped. If you begin a raid and your stats are getting wiped 50% through, you can self boost a little bit and do some damage. If they’re not getting wiped at all, you can self boost a lot. But if you’re about to get a stat wipe and you don’t know it, you’ll waste your chance to self-heal, burn a few turns self-boosting that amount to nothing anyway, and potentially lose the raid as a result.
- Partway through the raid, a Tera Raid shield will be put up. The Tera shield blocks anything that does not do damage directly. You need to Terastallize to do any real damage through the shield, and if you die when Terastallized you lose your Tera permanently.
- Terastallization becomes available once you hit the opponent with three damage-dealing moves. 6* raids often steal one charge from your orb, requiring you to hit a fourth to Terastallize. Plan on hitting four no matter the raid, and Terastallize as soon as possible (unless it’s a bad idea to do it at that time).
- The top bar is the opponent’s HP, and the bottom bar is the remaining time. When you die, you will respawn after a set time and after incurring a time penalty. This penalty is more severe for each human player that dies. NPCs dying does not punish you in any way. Actually, it’s often quite helpful!
- The remaining time is calculated in real time: because of this, the Nintendo Switch 2 version makes Tera Raids significantly easier due to animations and frame drops being much faster. Expect to have roughly 15 turns per raid in the Switch 1 version, and roughly 20 turns per raid in the Switch 2 version.
- Tera Raids are random and unfair. Just today I was hit by two critical hit earthquakes in a row that caused me to lose a raid. There are no 100% winrate strategies, only strategies that are more likely to win. This is part of the fun of Tera Raiding – you win despite the odds being stacked against you.
Next, let’s now dive in to the thought process behind how to prepare for a Tera Raid.
How to Build for Tera Raids
Your gameplay loop is basically:
- Before the raid, check when the stat wipe is and select a raider who isn’t getting hit super effectively.
- Then, using a build that attacks with a STAB type,
- Boost your own attack stats,
- Hit with that attack type,
- Self heal from that attack by Shell Bell, rinse and repeat.
Of course, there are other strats – but those strats all center around single strats like Stored Power, and you’re going to need to have more than just Psychic types available. This approach is a one-size-fits-all approach.
The best Tera Raid builds are straightforward and follow that gameplay loop: First, select a Pokémon that has Bulk Up, Calm Mind, Nasty Plot, or Swords Dance (or, in extremely niche cases, a substitute for these options like Charge Beam). Second, use attack options matching one of the types of the Pokémon for STAB. Third, build around attacking with that type exclusively.
For example, Koraidon is Dragon/Fighting. The best Koraidon build does not run, say, Fire Fang. It runs either a Dragon or Fighting primary attack, and exclusively that kind of primary attack. I’ve gone so far as to have one Koraidon built to attack with Dragon, and another one built for Fighting. You have to focus your build on that type for maximum effectiveness. (We’ll cover useful off-type attacks later – just know your primary attack needs to be focused on STAB).
This is pretty logical – when you approach a Tera Raid, you already know ahead of time the type that you need to be super effective against. The game directly tells you. Thus, you can run a build solely dedicated towards being super effective against that type, because why bother wasting a move slot for a move that won’t get a STAB boost and for a type you don’t need to attack with, when you could just produce another build to attack with that type instead? Don’t waste the move slot. Build to attack with one type!
Then, once you’re in the raid, you use one of the four stat-raising moves I listed earlier to boost your stats. Now just attack! Maximizing damage output is the priority, because HP will take care of itself via…
Self-Healing and Move Selection for Survival
Chief among the requirements for a successful raid build is the ability to self-heal by attacking. You are facing an opponent with 20 times your HP, and you will sometimes be hit twice or thrice in a row before you can attack again. The only functional ways to consistently survive these conditions is to use attacks that give you HP based on damage dealt, or for your held item to be the Shell Bell. Otherwise, you have to run the risk of taking more damage than you can heal with moveslot healing options, which will lead to your eventual KO.
So presume that, unless the build you’re employing is using Giga Drain, Drain Punch, or something similar, you will be running Shell Bell as your held item.
Details of the Build
When in doubt, see and copy this builds list. Presume that all builds in that list are holding Shell Bell and follow the EV and IV training as described in this guide.
IVs and Move Selection
Obviously, 6* Tera Raids require hypertrained, EV-trained Pokémon at level 100. Anything less will fail.
I recommend never running a primary attack that has less than 95% accuracy, or less than 80 base power. Inaccurate moves result in you having an unforeseen turn where you can’t self heal, and that leads to being KOed. Less than 80 base power results in you lacking the ability to self-heal in general! So 80 base power, 100% accuracy (conveniently, the stats of Tera Blast) is our floor for a primary attacking move.
That’s not to say you can only have one attacking move. While your primary attacking move should certainly, in all cases, have STAB from your base type and your Tera type, other moves happen to be extremely useful and also happen to be attacking moves. I’ve produced a list of the best moves for Tera Raids here, but I’ll make a note that Acid Spray reduces special defense by two stages and pokes through Tera shields, and Chilling Water reduces attack by a stage and also pokes through Tera Shields. There are many moves that could never function as a primary attacking move that are still perfectly serviceable, so keep an eye out for those! We’ll discuss more of these secondary moves in a minute.
Nature
Practically every build that you create will use either the Modest nature or the Adamant nature. The Adamant nature will boost your physical attack, and the Modest nature will boost your special attack. Once you’ve identified whether you have physical stat boosting moves or special ones available to your Pokémon, you’ll change your nature accordingly.
EV Investment (It’s complicated!)
Amateur Tera raiders simply put all their EVs into HP and the type they will attack with. This is a bad way to raid, and I explain why in this post.
Instead, while we will still put maximum investment into the attack type we will use, the remainder of the EV investment depends on the moves you’re using. Bulk Up and Calm Mind boost your Defense and Sp. Def, respectively. As such, the raid opponent will be more likely to hit you where you have not boosted your stats – If you boost special defense, they’re more likely to hit you physically, and if you boost defense, they’ll hit you specially.
Because the AI calculates the move that will do the most raw damage on you and knows its stats and your own, you are best served by putting the remainder of your EV investment into the defensive stat that will not be boosted by the moves you’re using. The end result of this is a noticeably more survivable Pokémon than you otherwise would have had.
However, let’s say you’re not running Bulk Up or Calm Mind, and instead only have Nasty Plot or Swords Dance available to you. In that case, you should split your stats evenly between defense and special defense. This serves to better defend against both types of attacks, and most raiders do have both types available to them.
Secondary Options
Most builds only need two moves: the stat booster and the attack. But you’ve got two more moveslots! This opens the door to other options like screens, weather, other stat modifiers and so on. I’d recommend checking this list of the best moves in Tera Raids to see if there’s anything that appeals to you. You can use Reflect to temporarily boost your physical Defense, for example, and use that at will during the raid. Taunt is excellent to stop other Taunt users and to stop some forms of self-boosting. There’s really a whole host of niche options to run should the need arise, so do the diligence and find what else can be useful.
And yes, some moves like Acid Spray and Chilling Water are useful enough that you should use them when they’d help, even if they’re not attacking with the same type as what you’re using. Be advised that the Tera Shield blocks all non-damaging status moves, so Thunder Wave, Metal Sound, etc. are no longer helpful once the shield goes up. Carefully weigh whether they’re worth a moveslot given that fact.
In Summary of Raid Builds
Raid builds should have a Tera type that gets STAB boost, boost their own attacking stats with moves and invest their EV and nature accordingly. Secondary options like screens, weather, terrains, stat lowering moves and such are also helpful. Raid builds should hold Shell Bell unless their primary attack is a self-healing move. Basically, you’re maximizing your damage output because that maximizes your healing, which maximizes your odds of survival and victory.
The Actual Raid
Okay, you know what gameplay loop to build for and how to roughly operate it, and hopefully you’ve picked secondary moves that cover your weak areas and boost your strong ones. Now it’s time to get into the nitty-gritty of how to actually raid.
First, check the Raid script. Your odds of victory depend on you knowing what’s coming. Second, check whether the raid is a physical attacker, special attacker or both.
Smaller Mechanics to Be Aware Of
I mentioned in the bullet points that a Tera Shield goes up, blocking most of the damage you do unless you’re Terastallized. Tera Shields also block any non-damaging move from having an effect, such as Metal Sound, Thunder Wave, whatever. It’s all going to fail. You can still procure these effects if the base move is doing damage, such as Acid Spray or Chilling Water.
NPC Partners sometimes have an impact on your raid, and some are significantly better than others. Gardevoir, for example, often spams Life Dew, keeping you alive when you otherwise wouldn’t make it. I’ve put together a guide on the NPCs here. If you spot the advantages that your NPC loadout for that raid has given you, you might be able to take advantage of them. For example, suppose you get the Arcanine NPC, who has Intimidate. It’s now more likely that the opponent will hit you with special attacks instead of the physical because the physical attacks are weaker, and that may change which screens you decide to put up.
If you’re playing with NPC partners, you automatically start the game with a free Defense cheer. This lasts for three turns. You should typically use this time to self-boost as much as possible and then, once it’s dropped, start dealing damage.
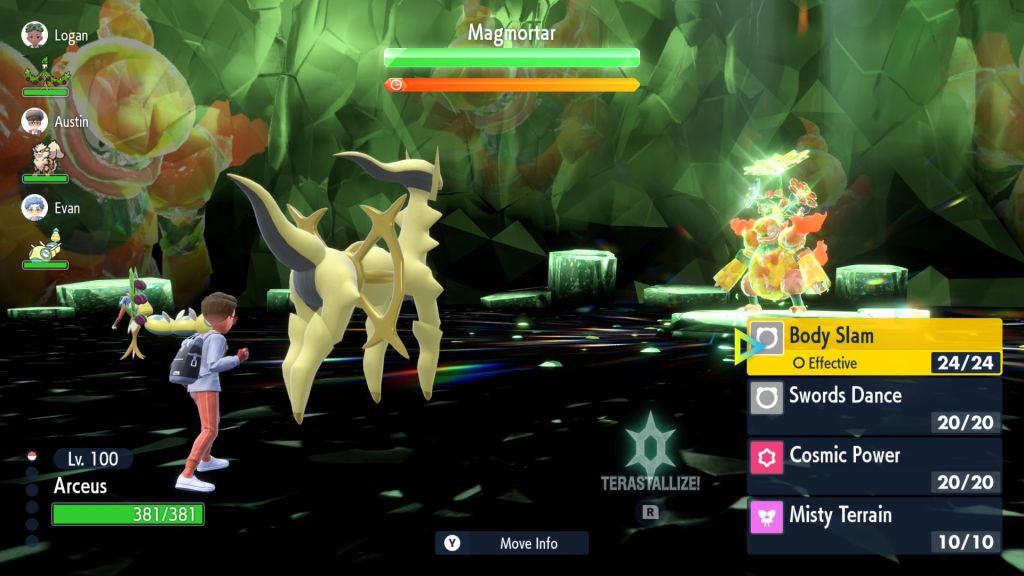
Raids that start with a scripted Taunt or other attack (i.e. Magmortar) have a 1 in 4 chance of targeting you with that attack. It is scripted that he’ll use that attack, but it’s not scripted that he’ll use it against you in most cases.
When NPC partners respawn, they often have mechanics that trigger. Arboliva sets Grassy Terrain, Intimidate users lower the opponent’s stats all over again, and so on. Keep an eye on what NPCs are about to come back and plan accordingly.
Heal cheers heal you a random amount, but most importantly wipe statuses you’ve been inflicted with. I use Heal cheers for this reason.
Cheers move before everything else in that turn, even if you’re outsped. Terastallization is the only exception to this.
Timing Your Terastallizing
Each time you hit the opponent with a move you gain one Tera Orb charge. (Double-hit moves like Double Kick, Tachyon Cutter only grant one charge.) You need 3 Tera Orb charges to Terastallize. Be aware that most 6-star raids will sap at least one Orb charge from you before you can Terastallize, so plan on needing 4 charges, not 3. Also, keep in mind that double-typed Pokemon do lose a type when Terastallizing, so you may lose some type resistances that were previously benefiting you.
You must Terastallize when or before the Tera shield goes up. If you’re not Terastallized when that shield goes up, you lose about 2/3 of your damage output right off the bat, and with it your ability to self-heal. Because of this, and the fact that many Pokémon wipe your stats about halfway through the raid, I would encourage you to not spend the first several turns jacking up your attack stats as high as they’ll go. Instead, a +3 attack or special attack is often enough to accomplish your goal while still building a Tera charge quickly enough so as to not be caught off guard with the shield.
Understand that if you die while Terastallized, you lose your Tera permanently. If the Tera Shield is still up at that point, you aren’t likely to win the raid without a partner carrying you the remainder of the way. When playing offline, I consider a raid wiped at that point. Dying is the worst thing to do in a Tera Raid.
The Mid-Raid Stat Wipe
Most Tera raiders, especially in Paldea, will wipe your stats at least once during the raid. They will leave your negative stats, so any Defense or Special Defense drops you have procured will remain, but remove your positive stats. Plan for this! Know when it’s coming. If you aren’t aware when it’s coming and spend your first five turns building your stats only for them to be wiped, you’ll find yourself without HP, without stats, and trying to poke through a Tera shield that you can’t poke through. It’s a bad scenario.
This is where secondary stat boosts and conditions come in – weather, terrains and screens survive the mid-raid stat wipe. If you anticipate you’re about to get a stat wipe, set up the environment to be a bit more in your favor for after the wipe. Screens are particularly useful for this, as they provide some defensive cover until you can get your stats back and continue attacking/self healing.
Keeping Momentum Through the Raid
Depending on the raid, there are several points at which the game tries to shut down your momentum. It steals Orb charges from you, wipes your stats, wipes its own negative stats, sets unfriendly weather, lands critical hits and so on. The real test of high-level Tera Raids is whether you can keep it together after having these setbacks. Here’s a few pieces of advice to prepare for these events:
- Know when it’s coming and fill your HP accordingly. If you anticipate being wiped in the next two turns, set a screen, weather or a Defense cheer, and then in the final turn land a hit to self-heal as much as possible.
- If you can, inflict a negative status or stat change on the opponent before the stat wipe. There’s a whole host of other useful moves for something like this, so the exact right option will be situational.
- Keep an eye on your NPC partners. If Gardevoir, Arboliva or Weavile are in the match or about to spawn back in, they have a chance of doing something that could help you.
- Be tracking how many hits it takes to KO you. If you’ve just had your stats wiped and you expect to be a 3-hit KO, drop a Defense cheer. That’ll turn you into a 4 or 5-hit KO, buying you a little time to set back up and start self-healing again.
- Finally, understand that critical hits just happen. They sometimes ruin raids by coming in at that exact right moment, and there’s nothing you can do. Oh well.
Closing It Out
If you can get through the mid-raid stat wipe and Tera Shield, you’re probably not going to have much difficulty afterwards. You’ve rebuilt your stats, recovered from whatever damage you’ve taken, and are likely now whaling away on the opponent. It should only be a matter of time (literally) that determines whether you win or not.
Congratulations! Keep doing a few more of these and you’ll get the hang of it. Tera Raids are fun and a nice exercise of creativity as a Pokemon teambuilder, and they bring an interesting new look to the mechanics of the game. I hope you experiment with new Tera Raid Builds and leave a comment telling me what you’ve found.

Thank You so much!
LikeLike