


The Spirits you should and shouldn’t be using and why
By JoKe07, Spirits Informer and Guest Contributor
What’s this guide’s purpose?
Hey, welcome to The Definitive Spirits Tier List! I’m JoKe07, but you’re likely here from The Definitive Spirits Guide, so I’ll keep the introduction short. I know a ton about Spirits, which is why I’m releasing my thoughts here in the form of a Tier List. If you want to learn how to train a Spirits amiibo, go check that guide above out. This guide is part of a series of guides, so it’ll make a lot more sense once you’ve done that.
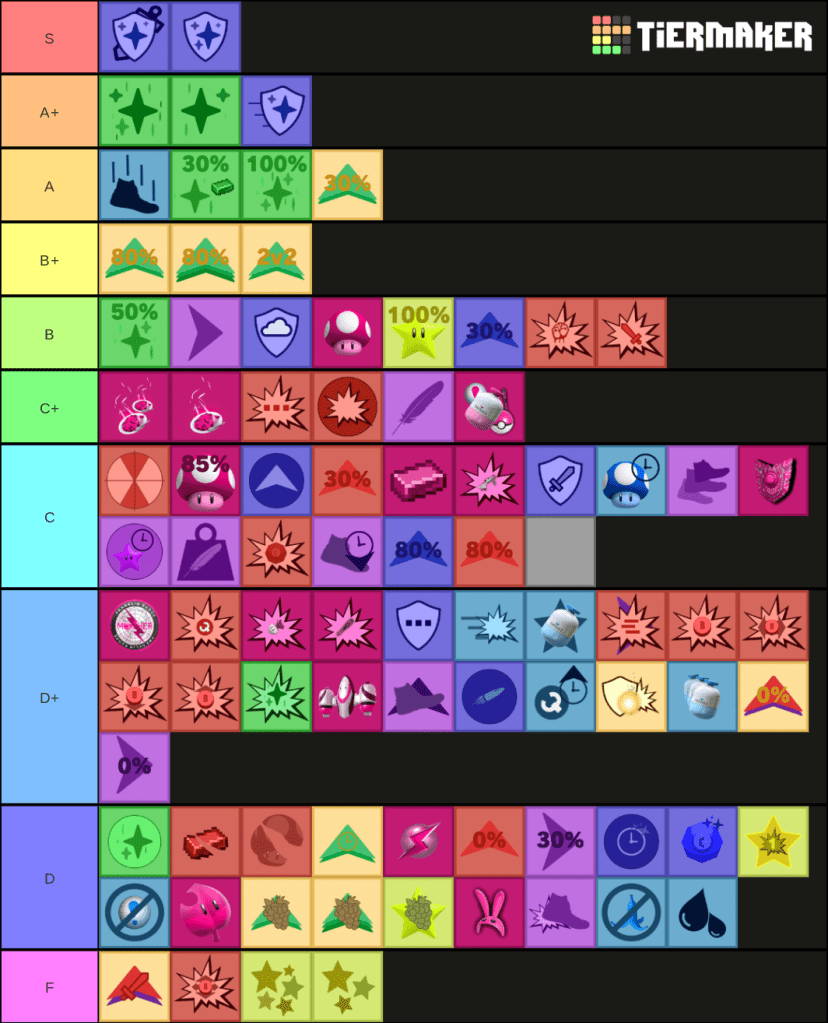
At the end of The Definitive Spirits Guide, I showed you a Spirit Effects Tier List, which ranks every Support Spirit you’ll find in tournaments. So now it’s time to explain that Tier List. Since the Spirits meta is actually interesting now (instead of just Max Defense + Super Armor / Armor Knight), many more Spirits are viable.
So, which Support Spirits should I be using?
Glad you asked, because I’ll be explaining each Tier of the Tier List in this order:
Tier Name
Brief Tier Description, explaining the overall viability of the Spirits in this Tier
Spirit Effect (# amount of Support Slots it takes up): explaining the effects of the Spirit and the overall usefulness of it, and other tidbits of information pertaining to the Spirit.
Disclaimer: Just because a popular YouTuber used a Spirit doesn’t make the Spirit instantly S Tier. Read each Spirit explanation to understand why some Spirits are lower or higher than others. Trust me, I’ve done tons of research on this.
The higher a Spirit is on this Tier List, the more generally useful it becomes. Also, certain Spirits are higher than others just because more characters can use them. If you want to find a specific Spirit, use Ctrl + F to find it. If you’re just looking for the strongest Spirits to add to an amiibo, add one from S Tier. Those Spirits are obscenely broken. Just keep in mind that the Spirits in S Tier and A+ Tier are banned from competitive tournaments. Only add those to your amiibo if you’re training a Raid Boss or a personal amiibo. Also, reminder that Hazard Spirits (like Sticky-Floor Immunity) and Final Smash Spirits (like Chance of Double Final Smash) aren’t ranked due to Hazards being 100% useless and Final Smash Spirits being a separate meta. Now, it’s time to explain the Spirits you should and shouldn’t be using and why.
S: The Big 5 (Upper Half)
We’re going to be starting with S Tier: The Big 5 (Upper Half). These 5 spirits are banned in practically every Spirits Tournament you’ll enter, and for good reason. If you’re just making an amiibo to fight friends or other amiibo, you should definitely put on one of these. However, don’t use these 5 if you want to ever enter them into tournaments. If a tournament ever allows it, amiibo with these spirits will win, and it won’t be close.
But why are they banned? I’ll explain.
Armor Knight (2 slots) – Armor Knight is utterly ridiculous. You get a nice 1.15x attack increase and an absurd 1.8x defense increase. Your speed gets decreased to .7x, which seems like a fair trade. Except this spirit takes up only 2 slots. Guess what that means? Make Trade-Off Ability your 3rd slot. You’ll now have a 1.35x attack increase, and a 2.16x defense increase and your speed isn’t as bad, at .84x. You also start every stock at 30%, but guess what? You now take such a little amount of damage that this 30% is almost nonexistent. This setup is broken as all hell, which explains why it’s banned.
Super Armor (3 slots) – You don’t take any knockback for a while (until around 70% normally). You can power through practically anything for a while, making you pseudo-invincible for most of the match. Combine this with a command grab *cough* Alolan Whip *cough* and you just win. It’s ridiculously unfair, although not to the extent of Armor Knight.
A+: The Big 5 (Lower Half)
Wait, didn’t I just cover A+ Tier: The Big 5 (Lower Half)? Well, sorta. These Spirits are still part of the Big 5, but are noticeably worse than Armor Knight and Super Armor. They are still banned from every tournament, but aren’t as stupidly broken as the 2 in S Tier. This puts them in a weird lean spot, but rest assured that they’re still 100% banned and won’t be changing any time soon.
Great Autoheal (3 slots) – Behold, the single lamest Spirit in all of smash. You heal 5% every 5 seconds. Combine this with a higher than average defense stat and you have an amiibo that heals as much as it takes damage. It makes matches stretch on for eternities, and is ridiculously dull to watch. It’s anti-fun and unnecessarily broken.
Autoheal (2 slots)- See above but replace 5% with 3%. It takes up 2 slots as well, allowing you to be lame and have a Trade-Off at the same time! This is by far the fastest way to lose your friends, and it’s banned. No reason to bother with this spirit.
Slow Super Armor (2 slots) – It’s Super Armor- but you’re slow. Incredible. It takes up only 2 slots, but your movement speed is .3x what it normally is. It’s not even close to as good as Super Armor due to the ridiculously slow speed you have. This horrid speed can leave you super vulnerable offstage too. However, Super Armor is still Super Armor.
A: Verge of Bannable
Now we’re moving onto A Tier: Verge of Bannable. These spirits are really good and are all good enough to be banned in certain places. Not all of them are always banned (Trade-Off Ability is never banned, but Instadrop almost always is), but they’re all still really, really good.
Instadrop (2 slots) – Instadrop is banned nearly everywhere. Some people refer to it as part of the Big 5 as well (making it the “Big 6”). So what exactly does this Spirit do? It allows your amiibo to instantly drop to the ground, and deal damage when falling. There are 2 reasons why this Spirit is so good. First of all, it messes with the opponent’s AI a bit. The opponent isn’t expecting to randomly get 9% whenever they’re below an Instadrop amiibo. Also, it can true combo into some really strong moves. Why does Luigi have instadrop? Instadrop > Up B. Jigglypuff? Instadrop > Down B. This Spirit isn’t the best for everyone, but when it’s good, it’s stupidly good. Instadrop is one of the main reasons the Spirits Tier List and Vanilla Tier List are different. If it’s not banned in a tournament, chances are that you’ll see plenty of Instadrop amiibo making it very far and causing abnormal upsets.
Critical Healing & Metal (2 slots) – This Spirit is risky but powerful. It gives you Metal for 13 seconds and heals you by 30% when you reach 80%. On every single stock. This means you can get 39 total seconds of Metal and heal 90% in 1 normal match. That’s pretty damn good, allowing you to almost always have an advantage on every stock. Oh yeah, and it also takes only 2 slots. Since it only takes 2 slots, you can put Floaty Jumps on it, which reduces the risk of dying offstage if you do happen to become metal offstage. This also means you can put Trade-Off Ability on it, and since this Spirit heals 30% every stock, you basically have no drawback of Trade-Off Ability. This Spirit has insane possibilities, but is held back on many characters due to poor recoveries.
Critical Health Healing ^^ (3 slots) – You heal 100% when you reach 100% on your first stock. This spirit is basically an extra stock. If you combine this with decently high defense, you’ll have a tanky amiibo that has 4 stocks. The only downside to this is that if you get hit with a move that KOs at the same time you pass 100%, you’ll heal 100% but still take all the knockback and die, effectively wasting your Support slots. This Spirit is still worth the 3 slots it takes if it works right.
Trade-Off Ability (1 slot) – I’ve mentioned this Spirit several times already, and now you get to see why. This Spirit is the best spirit you can use for a single slot. It makes you start every stock at 30%, but you get a 1.18x attack bonus, 1.2x defense bonus, and 1.2x speed bonus. This is basically 3 separate spirits wrapped into 1 with a small price attached. The only, and I mean only reason this Spirit isn’t higher is because high attack amiibo can gimmick you in only a few hits. This spirit could be worth 2 slots and it’d still be worth equipping.
B+: Really Good
Next is B+ Tier: Really Good. These few spirits are really good, but situational enough that they don’t make A Tier. They’re still clearly better than B Tier, which is why they fall into B+ Tier even though they are relatively situational.
Critical Health Stats (1) – This spirit is very similar to Trade-Off Ability, except it activates when you hit 80% on every stock. You get a 1.1x attack bonus, 1.3x defense bonus, and a 1.3x speed bonus for 20 seconds. This spirit is underrated but surprisingly good for 1 slot. If you don’t know what to equip, this Spirit is never a bad choice.
Critical Health Stats ^^ (2) – This spirit is the same as above, except it takes 2 slots. It gives a 1.18x attack bonus, 1.38x defense bonus, and 1.4x speed bonus for 25 seconds. Equipping this is slightly better than equipping 2 Critical Health Stats, as this version lasts longer. 2 Critical Health Stats gives the same attack and defense bonus, but slightly more speed and for a shorter time. You don’t need more speed than you already have at this point, you want the extra time instead.
Team Power Up (2) – This spirit only takes effect in team battles, but the effect it gives is ridiculous. It grants you a 1.26x attack increase and a 1.36x defense increase for just 2 slots, all without any drawbacks. This spirit would be banned if it worked outside of team battles. You can also combine this spirit with Trade-Off Ability to get even more ridiculous numbers. Keep in mind that this spirit is utterly useless outside of team battles, so only put this on if you’re specifically entering it into a doubles tourney of some kind.
B: Above Average
The next tier is B Tier: Above Average. These spirits are generally better than every spirit below this tier, but a good chunk of these are situational. You’ll see most of these spirits relatively often, and for good reason. They’re just good options.
Critical Health Healing (2) – The inferior version of Critical Health Healing ^^. This spirit only heals 50% when you reach 100 on your first stock. You have more versatility since this only takes 2 slots, but you lose the “4th Stock” effect that the ^^ version produces. Better to just use the ^^ one and call it a day.
Move Speed Up (1) – Move Speed Up is such a helpful spirit for a decent chunk of the cast. This spirit increases your horizontal move speed by 1.2x. For a lot of characters (Cloud, Chrom, Dr. Mario, etc.), this Spirit vastly increases their recovery and prevents them from being gimped all the time. For some other characters (mainly Link, but there are a couple of others as well), this Spirit can help fix some AI flaws (Link SDing with boomerang) related to recovery. It’s a really helpful spirit when used right. Alternatively, you could just equip Trade-Off Ability instead, as it provides this Move Speed bonus and bonuses to attack and defense as well.
Air Defense (1) – Air Defense is almost always a good option. You receive a 1.3x buff to your defense while you’re in the air. This is good because if you’re in the air constantly, you take significantly less damage. If you’re not in the air constantly, it’s still good since you don’t want to be in the air. This seems illogical, but it’s simple. If you’re at your weakest in the air, you obviously don’t want to be in the air at all. So if you’re taking less damage in the air, that’s good for you, since you just helped fix your greatest weakness. This Spirit is just all-around useful. If you don’t know what to add to your amiibo, you might as well choose Air Defense.
Giant (2) – Giant is an interesting Spirit. On your first stock, your size and attack increase is identical to a Super Mushroom (1.56x attack increase) for 8 seconds. This spirit is only really good on specific characters, but it can rob games so easily. The attack increase and size change allow you to chain smash attacks into each other, which can result in stocks taken at 0% if done right. For example, you may have heard of Giant Link. The Giant Link setup is just Giant & Weapon Attack up, but the real danger is how you train it. The way you train a Giant Link is by focusing on Up and Forward smash significantly more than average. The outcome of this is a link that almost always takes the first stock by using Up Smash > Up Smash > Up Smash. Giant would be busted if it weren’t so random. Giant amiibo can get countered by Curry amiibo, and don’t always steal a stock with Giant in time. It’s better to not use this Spirit unless you’re making a stock stealing setup. It can still be incredible if used correctly.
Critical Immunity (2) – Critical Immunity is another interesting spirit. It grants invincibility for 7 seconds once you reach 100% on every stock. This spirit can be especially helpful if you’re fighting a character with multi-hit smash attacks (Link, Zelda). The main problem with this spirit is that when you reach 100%, you’re usually either offstage or KO’ed. This means that your Immunity is wasted a decent chunk of the time due to you being invincible offstage and taking several seconds to return to the stage. It’s still good since this spirit screws with the opponent’s AI while you’re invincible, allowing you to land several free attacks while they proceed to not hit you.
Trade-Off Defense (1) – You should equip Trade-Off Ability instead. You get a sharp 1.4x defense boost, at the cost of 30% on every stock. This high Defense boost can cause your 30% issue to become nonexistent, as you’ll take so much less damage than normal. It can be really effective, especially with a higher than average Defense stat. However, you should equip Trade-Off Ability instead, as it also boosts Attack and Move Speed too.
Physical Up (1) – While this Spirit isn’t necessarily better than the rest of the Attack Up Spirits, it’s by far the most common one you’ll see. It boosts Physical attacks by 1.1x, and a significant portion of the cast uses Physical attacks.
Weapon Up (1) – Again, this Spirit isn’t better than the other Attack Up Spirits, but it’s also really common. This Spirit boosts the Weapon attacks of the cast by 1.1x. Around ⅕ of the cast uses a weapon of some sort.
C+: Good
The next one up is C+ Tier: Good. These Spirits are generally good options in most circumstances and can be crucial to specific setups at times. Most of the time, you should aim for all of your 3 support Spirits to be C+ Tier or higher.
Mouthful of Curry ^^ (3) – Mouthful of Curry ^^ is a wacky spirit. For 22 seconds on the first stock, you have a slightly longer version of Superspicy Curry. This spirit is great for shutting down Giant amiibo, and can often help you secure the first stock at times. The main downside to this Spirit is that it costs 3 slots, which is fair given its usefulness against getting annihilated by Giant. Curry is also super obnoxious to fight, since the opponent is busy getting torched by curry instead of landing any hits on you.
Mouthful of Curry (2) – This Spirit gives you Superspicy Curry for 12 seconds on your first stock. It’s great against Giant, and can help you get a nice % lead, but not to the extent of Mouthful of Curry ^^. However, you have 1 extra slot to play around with. I would recommend using the ^^ version since it’s more gimmicky, but this one is still a great option too.
— Up (1) – This is all of the remaining Attack Up Spirits (Fire & Explosion, Electric, Magic, etc.). These spirits are good on specific characters, and all deal a 1.1x attack bonus for that attack type. They’re only lower than Phys Up and Weapon Up since these spirits are only really useful on very specific characters. You can’t put PSI Up on Donkey Kong, after all. These spirits are still always a good choice for the specific character you’re training. If you aren’t creating a specific setup, equipping one of these is always a good option. Just make sure you add the correct — Up Spirit to your amiibo (Magic Up for Zelda, Aura Up for Lucario, etc.).
Shield Damage (1) – Shield Damage is another interesting spirit. You deal 1.3x damage to your opponents’ shields. With certain characters, you can make instant shield break setups. For example, give Yoshi Phys Up, Shield Damage, and Toss & Meteor. Yoshi now breaks shields instantly with Down B. This Spirit is also generally a decent option anyways since it allows you to get shield breaks much more often.
Floaty Jumps (1) – Floaty Jumps is the best spirit you can use for recovery. It slows your falling speed to .65x after jumping. This means you can recover from practically anywhere with ease. It’s also insane on Little Mac, who becomes absolutely ridiculous with Floaty Jumps. This Spirit is far better than Additional Midair Jump since Floaty Jumps only takes up 1 slot and can help you recover from even longer distances.
Assorted Items (1-3) – Assorted Items (like the Beam Sword, Beast Ball, Ray Gun, etc.) are hard to rank. Some items (like the Ore Club) are even more powerful than Super Armor at times, and items on the field can cause both amiibo to act a bit weirder. However, amiibo can also instantly chuck their item off the stage, and you just wasted your slots. I’m putting them at bottom of B because they can be really good, but they can also be outright useless. I also don’t have enough data to justifiably rank an extra 50 or so items, which is another reason why they’re all clumped together. However, I did rank the Transformation Items (Giant, Back Shield, Screw Attack, etc.) since you see those items significantly more often.
C: Situational
Now onto C Tier: Situational. These Spirits are only good in certain situations, and even then they’re barely viable. You shouldn’t equip these spirits unless you’re specifically making a certain setup of some kind.
Toss and Meteor (1) – News Flash- this Spirit isn’t very good. Recently, I found out that it doesn’t actually deal more knockback than other Spirits. So, what does it do? It boosts the damage of moves that fall into certain angles by 1.1x. The angles boosted are ones between 60-120 and 241-300. More simply put, it boosts the angles in the shaded sections of this image. Not many characters can utilize this Spirit very well, which is why it’s in C Tier.

Critical Super Giant (3) – This Spirit might just be a contender for the most gimmicky Spirit to date. Once you reach 85% on the first stock that you get to 85%, you get a size and attack increase identical to a Lightning Bolt backfire (1.84x attack increase). Usually, this spirit allows you to take the first stock. The problem with this Spirit is that it usually happens when your opponent is already at kill percent. The reason Giant is much better is because it allows you to take the first stock when your opponent is at 0. This Spirit also costs 3 slots. It can still be good since you can get an early lead and coast from there, but there are better options.
Shield Durability (1) – Shield Durability is alright, as far as Spirits go. It enhances your shield strength by 1.4x, and your shield recovery by 1.5x. If you’re making a defensive amiibo, this can be good to prevent shield breaks. Otherwise, you’re better off equipping something else.
Trade-Off Attack (1) – You should equip Trade-Off Ability instead. You get a 1.23x attack increase, which is nice. However, Trade-Off Ability gives 1.18x attack, and the defense and speed buffs. Trade-Off Ability is just insane. This Spirit is far outclassed by Trade-Off Ability, but it isn’t a bad option on its own.
Made of Metal (1) – Let me just say this: Made of Metal is way too overrated. You become metal for 13 seconds, but only at the start of the match, on your first stock. You don’t need metal at 0, you need it at kill percent (*cough cough* go read A Tier *cough cough*). Since you basically can’t die until 200% if you have metal, it doesn’t have much use at the start of a match, besides punishing 1 or 2 moves. It’s also decent against Giant since you can’t get gimmicked by it. Generally just not that good of a Spirit, but it can be useful due to it only taking up 1 slot and preventing Giant setups.
Shooting Up (1) – Increases the power of certain moves and Shooting items by 1.1x, and increases ammo by 1.2x. Shooting items are items like the Ray Gun and Rage Blaster. Not that good as you’d need items or a projectile-heavy character to make this work.
Weapon Resist (2) – Finally, a Resist Spirit. Weapon Resist reduces any damage you take from Weapon attacks by .6x. This is the best resist out of all of them since around ⅕ of the cast utilizes Weapon-type moves. However, it costs 2 slots. Generally not a good option unless you’re counter-picking someone in a Crew Battle or Switching tournament. However, it’s a frighteningly good option against certain characters, and can turn matchups from unwinnable to plausible in a matter of seconds.
Transformation Duration (1) – Transformation Duration is a really underutilized spirit. It extends the Transformation time of certain Spirits (like Giant) by 1.5x. This spirit is excellent for Giant since the extra 4 seconds of Giant can often allow you to snag an early KO. However, equipping a different Spirit is generally better.
Additional Midair Jump (2) – This Spirit gives you exactly what the name would suggest, an additional midair jump. It’s relatively pricey since it costs 2 slots, so you should equip Floaty Jumps instead. Floaty Jumps is just generally better for recovery, and amiibo don’t use the additional jump that well either. It’s still usable, and you can even combine it with Floaty Jumps if you truly wanna recover from anywhere.
Back Shield (1) – This Spirit gives you a Back Shield for the first 30 seconds of the fight. And yes, I’m ranking the item transformation Spirits separately but lumping all the normal items together. Don’t @ me, the normal item spirits all have the same flaws. Anyways, the Back Shield is one of the better item transformation Spirits, since the Back Shield allows you to get hit with a fully charged Lucas Up Smash and then punish him for it. From what I’ve seen, amiibo are pretty good with using the Back Shield too. However, that won’t save this spirit from being just plain worse than any normal stat buff.
Easier Dodging (1) – Look, it’s another overrated Spirit! Easier Dodging increases your Air Dodge distance by 1.2x and your intangibility frames by 1.2x as well. Any normal amiibo shouldn’t be dodging much anyways, and the extra intangibility will maybe have an effect once or twice a match. Not as good as some people say, although it can boost recoveries slightly due to the extra dodge distance.
Lightweight (1) – Lightweight is an interesting Spirit. You become .9x of your normal weight, but gain 1.3x move speed and a slight increase to your jump height. It’s risky but good on heavyweights with poor recoveries (like Ganondorf). It’s normally just better to use Move Speed Up and have no risk involved, but there are some niche uses for this Spirit.
Hyper Smash Attacks (1) – Hyper Smash Attacks? Why is it down here? Since it boosts all of your smash attacks by 1.1x and also slightly increases smash attack charging speed, why wouldn’t it be good? For some unholy, stupid reason, this Spirit doesn’t increase the knockback output as much as it should. You’ll do the extra damage, but no extra knockback. It makes absolutely zero sense. The damage is nice, sure. But you should just equip a different Spirit instead, this one won’t help you as much as it should.
Landing Lag Down (1) – Landing Lag Down is pretty much never a bad option, but it’s seldom a good option either. Your landing lag duration is reduced by .7x. It’s primarily good on Instadrop, as this Spirit allows you to true combo even more stuff out of the drop. Besides that, you really shouldn’t be using this Spirit.
Critical Health Defense (1) – You should equip Critical Health Stats instead. Critical Health Defense gives a 1.3x defense increase when you reach 80% on every stock. However, Critical Health Stats gives a 1.3x defense increase, 1.1x attack increase, and 1.3x move speed increase. You should always opt for Critical Health Stats. The only reason this Spirit can be useful is because you can combine it with Critical Health Stats to get an insane defense boost (that you can’t get from 2 Critical Health Stats) at 80%.
Critical Health Attack (1) – You should equip Critical Health Stats instead. Critical Health Attack gives a 1.1x damage increase when you reach 80% on every stock. If you read the Critical Health Defense info, you know why this is here.
Blank Slot – This isn’t actually a Spirit, it’s instead the option of choosing nothing for a slot. A Blank Slot will give you about a 5.7% attack increase. This isn’t much, and you should almost always opt for any standard Spirit instead. But there are worse Spirits than a Blank Slot, which moves us onto…
D+: Poor
…D+ Tier: Poor. These Spirits are generally pretty bad and have niche uses. Pretty much every Spirit here is just outclassed or isn’t very useful. A blank slot will almost always be better than any of these.
Franklin Badge (2) – This Spirit gives you the Franklin Badge for the first 23 seconds of the battle, which lets you reflect all projectiles. It’s good against specific characters, but the limited use and the cost of 2 support slots make this Spirit go from great to meh pretty quickly.
Strong Throw (1) – Strong Throw increases the damage of grabs and throws by 1.1x. You should just equip a standard Attack Up instead, then see if you have slots left afterward instead. You really shouldn’t need to boost throws, but if for some reason you do, this is the Spirit for you.
Thrown Up (1) – Increases the power of Thrown items by 1.1x, and increases the speed of the item thrown by 1.3x. A Thrown item is any item you can “chuck”, plus a couple of extra moves like Rob Gyro when thrown. You should equip something else, this spirit is pretty bad. Not as bad as Battering Up, but still bad.
Battering Up (1) – Increases the power of Battering items by 1.1x. Battering items are items like the Beam Sword, Ore Club, and Killing Edge. Only really useful when using items, and still not that good anyway.
— Resist (1) – This is all of the Resist Spirits (PSI Resist, Ice Resist, Energy Resist) that haven’t been explained yet. These Resist Spirits let you take .6x the damage you normally would from that move type. If you have Aura Resist, you take less damage from Aura attacks. These aren’t very good, since you now do better against only 1 or 2 characters. However, the Spirit does nothing against everyone else. This is only useful if you’re specifically counter-picking somebody for whatever reason.
Impact Run (1) – Imagine Instadrop but bad. This spirit gives you a hitbox while running, and amiibo will often use the Impact hitbox to attack. This attack only does 3-5 damage, and does even less, depending on your opponent’s defense stat. It just doesn’t work well, and often gets you punished if your Impact attack gets shielded.
Item Autograb (1) – You pick up nearby items when not running. I shouldn’t even need to explain why this one sucks, all I need to do is tell you that items that spawn are turned off in tournaments.
Dash Up (1) – Your dash attack does 1.1x damage, and you move slightly faster while running. This buffs exactly one move. This Spirit sucks. Go find out what type your dash attack is (Weapon, Physical, etc.) and go equip the — Up version instead. Also, the increased dash speed is practically useless since most amiibo shouldn’t be running in the first place.
B Up (1) – Exactly 1 move is buffed. See above for what you should do instead of equipping this.
Up B Up (1) – Exactly 1 move is buffed. See above for what you should do instead of equipping this.
Side B Up (1) – Exactly 1 move is buffed. See above for what you should do instead of equipping this.
Down B Up (1) – Exactly 1 move is buffed. See above for what you should do instead of equipping this.
KOs Heal Damage (2) – You heal 20% every time you KO an enemy. In a normal match, this is 40% healed. For 2 slots, this Spirit is a real letdown. Go equip Critical Healing & Metal instead, that Spirit heals 90% and gives you metal too.
Rocket Belt (1) – This Spirit gives you the Rocket Belt for the first 25 seconds of the match, which lets you fly everywhere for a bit. You don’t need to be flying unless you’re recovering, so this Spirit is worse than useless on the ground, but really useful offstage. It’s still just plain bad since it only works on your first stock, but it can be useful sometimes.
Jump Up (1) – Your jump height is increased by 1.4x. If you want recovery, equip Lightweight or Floaty Jumps instead. Otherwise, don’t use this spirit.
Parry Reflect (1) – You reflect projectiles when you parry them. It sounds cool but does practically nothing in practice. You should use something else.
Improved Escape (1) – Makes grabs and stuns easier to escape, making the grab duration .6x. The problem is that amiibo can already frame-perfect mash, and can get out of most grabs fast enough anyways. This does not apply to command grabs, so don’t come crying to me when your precious amiibo still gets grabbed by Incineroar Side B over and over.
Energy Attack/Resist (2) – This Spirit is just Energy Attack and Energy Resist combined into the same Spirit. You don’t want this, since Resists are generally bad and a waste of a slot (unless you’re in a counter picking tourney of some kind). Equip the normal Energy Attack and find a different Spirit to put in instead.
Item Gravitation (1) – Item gravitation draws items closer to you. This is just the inferior version of Item Autograb, and it shows. You’ll never need this Spirit.
Undamaged Attack & Speed (1) – This Spirit gives you a 1.1x attack increase and a 1.3x move speed increase, while you’re at 0%. Equip a Trade-Off instead, this Spirit is just way too inconsistent.
Undamaged Speed (1) – This one gives a 1.5x move speed increase while you’re at 0%, which is quite a lot. However, the main point of movement speed is to help with recovery. If you’re at 0% you don’t need to recover. It’s just bad, go equip Move Speed Up for permanent effects.
D: Useless
Next up is D Tier: Useless. These Spirits are terrible, and should never be used under any circumstances. A blank slot is always better than one of these.
Healing Shield (1) – You heal .15x of the damage your shield takes. This isn’t very good, because you’ll need to take around ~160% to your shield to even match the effects of KOs Heal Damage. If you’re so insistent on using a Healing Spirit, just use Critical Health Healing & Metal.
Metal Killer (1) – You deal 1.4x the damage to Metal opponents. They still won’t die since Metal opponents take practically zero knockback. Also, this only works when the opponent is Metal. This means this Spirit is useless for 80% of the match. Just equip something else. It’s only slightly higher than Giant Killer since Critical Healing & Metal gives 39 total seconds of Metal, which is actually quite a lot of time for you to do that sweet extra damage.
Giant Killer (1) – You deal 1.4x the damage to Giant opponents. Problem 1: Your opponent is only Giant for a short time. Problem 2: They won’t die from your increased damage, since Giant opponents take less knockback. Just equip Curry instead, it does wonders against Giant amiibo.
Running Start (2) – Running Start is one of those Spirits which looks really cool until you compare it to other Spirits. It gives a 1.1x increase to damage, a 1.3x increase to defense, and a 1.3x speed increase for the first 20 seconds of the match. The stat buffs and time are identical to Critical-Health Stats, but then it goes downhill from there. It costs 2 support slots and only activates once, at the start of the match. It might be good if it activated every stock- but it doesn’t. It’s just bad.
Screw Attack (2) – This Spirit gives you the Screw Attack for the first 18 seconds of the match. Occasionally, amiibo can do some gimmicky things with it. The problem is that this Spirit has a price of 2 slots, which is just too much.
Undamaged Attack (1) – You should equip Undamaged Attack & Speed instead. Undamaged Attack gives a 1.1x increase to damage when you’re at 0%. However, Undamaged Attack & Speed gives a 1.1x increase to damage and a 1.3x increase to speed. Always equip Undamaged Attack & Speed instead although you should just ignore undamaged spirits entirely.
Trade-Off Speed (1) – This Spirit is really bad. You start every stock at 30%, and all you get is 1.4x as much speed. Either equip Trade-Off Ability or Move Speed Up. Both give less speed, but just pure speed isn’t worth the 30% every stock, unless you’re doing a bit of trolling with a Sonic amiibo.
Easier Parry (1) – Makes Perfect Shielding easier. You have 1.4x as many frames to parry. However, amiibo are already excellent at parrying (if you train them to). This Spirit won’t help you at all. At least Healing Shield has some sort of benefit.
Unflinching Charged Smashes (2) – You gain Super Armor when charging smash attacks. Not when you release the move, only when you’re charging them. You should never teach your amiibo to charge smash attacks, as they won’t release the smash attacks well. Stay away from this Spirit, as it also costs 2 slots for some terrible reason.
First Strike Advantage (2) – You become invincible for 5 seconds after landing the first hit of the battle. This takes up 2 slots. And it goes off once. Critical Immunity is better by miles, so if you want invincibility go equip that instead.
Bury Immunity (1) – You’re immune to burying, like the Pitfall item or King K. Rool’s down tilt. This will only help you in like 2 matchups. And when I say “help”, I mean “you don’t get buried but you get fsmashed instead”.
Super Leaf (1) – This Spirit gives you the Super Leaf for the first 25 seconds of the match. Imagine Rocket Belt, except even worse. Your opponent can easily take it from you, and this will hardly help you recover anyways. The limited duration doesn’t help either. Just equip Floaty Jumps and call it a day.
Stats Up After Eating (1) – You gain 1.1x attack, 1.3x defense, and 1.2x move speed. Pretty solid, right? No, because you get the stats for only 5 seconds after eating. When are you going to eat food? Just equip Critical-Health Stats, which is just this Spirit but 8 times better.
Stats Up After Eating ^^ (2) – The “I’m an imbecile” version of the normal one. You waste 2 slots now, just to get 1.18x attack, 1.38x defense, and 1.35 move speed for 7 seconds. You shouldn’t be using 1 slot on this Spirit, let alone 2.
Invincibility After Eating (2) – You become invincible for 4 seconds after eating food. Why does this even cost 2 slots? It’s utterly horrendous; you’ll never be eating food anyways.
Bunny Hood (1) – This Spirit gives you the worst transformation item in the game- the Bunny Hood. For 12 seconds, you get to enjoy increased movement speed and jump height. Jeez, just equip Move Speed Up or Lightweight if you wanna recover so badly.
Braking Ability (1) – Makes stopping 2x easier when walking or running. Who in their right mind wakes up one morning and says “man, I really wish my amiibo could turn around 4 frames faster”? It can be funny if you make a Sonic with Trade-Off Speed, Move Speed Up, and Braking Ability, but it’ll never be practical in any other situation.
Falling Immunity (1) – You become immune to tripping from Banana peels and earthquakes and such. You could also just not use this Spirit, problem solved.
Swimmer (1) – You can’t drown in water. Now go ahead and tell me how many legal stages have water hazards. The answer doesn’t matter, since amiibo know how to get out of the water anyways. This Spirit is the single most useless Spirit for amiibo, but there’s still more to this Tier List.
F: Worthless
“What’s worse than the Swimmer Spirit?”, you may ask. To you, I present F Tier: Worthless. You should never use any of these Spirits in any situation. They may sound and look good, but they’re not. There’s absolutely no reason to use these Spirits, and I’ll explain why.
Weapon Attack & Move Speed Up (2) – Weapon Attack & Move Speed Up absolutely sucks. Don’t get me started on this. For 2 slots, this gives you a 1.1x increase to Weapon Attacks and a 1.1x increase to Move Speed. Weapon Attack Up (1) gives a 1.1x increase to Weapon attacks, and Move Speed Up (1) gives a 1.2x increase to movement speed. You should always equip the separate Spirits instead. You’ll get more out of it. “Oh, but I can stack Weapon Up and Weapon & Move Speed Up because there are no diminishing returns”. Shut up. If you do that, you get a 1.21x increase to Weapon Attacks and a 1.1x increase to your Move Speed. If you do 2 Weapon Ups and 1 Move Speed Up, you get a 1.18x increase to Weapon Attacks and a 1.2x increase to Move Speed. You should always go for 10% more speed. So just equip the separate Spirits instead. This isn’t even a debate, this Spirit unquestionably sucks. However, it doesn’t suck as much as…
Special-Move Power (1) – …Special-Move Power. This increases the damage of all your Specials by 5%. If you equip a blank slot, you get around a 5.7% increase to damage anyways. This spirit is worse than choosing nothing. Even if your character does only special moves and nothing else, it’ll still be worse than a blank slot. Don’t ever use this, unless Nintendo patches it.
Critical Hit ^^ (2) – Just so you know: this Spirit does not increase the chance that Hero will get a Crit on his smash attacks. It gives you a 12% chance to deal 1.3x more damage on a hit. Not knockback, just damage. If you do the math, this equates to a mind-boggling 3.6% damage increase overall. Remember when I said a blank slot gives you a 5.7% damage increase? Yeah, don’t use this spirit. Ever. It would still be flaming garbage if it was only 1 slot.
Critical Hit (1) – Welcome to the somehow even worse version of Critical Hit ^^. This time around crits only deal 1.2x as much damage, and you only have a 5% chance to hit them. Once you run the numbers, you’ll find that your damage output is increased by exactly 1%. Amazing. If you ever see someone using this Spirit for any reason, bully them. They deserve it.
Now that you’ve read the effects of pretty much every Spirit in the game, find the Spirits you want to equip on your amiibo and return to The Definitive Spirits Guide.
Although everything I’ve said is true, other qualified people besides me in the Spirits scene have opinions about specific Spirits as well. Since there’s so many diverse Spirit effects, people are bound to find certain Spirits better than others in ways that I may not have touched on. I’ve asked some other qualified people their thoughts on this Tier List; specifically what they would change about it. Here’s the thoughts of other qualified Spirits Trainers in the scene. You can find these thoughts here.

This still proves useful to me in 2025, knowing the exact numbers really helps. Still annoying that they really never bothered to make Crit Health Attack and Crit Health Defense anything but entirely outclassed by the all stats variant. Why do they exist then. There could have been an interesting dichotomy of whether to spec in a bit of every stat or just beef up a single one a lot. It’s weird cause that DOES exist for the Trade Offs. ?? Unfortunate, cause every now and then I see (probably less experienced) amiibo players using entirely outclassed abilities on their amiibo, completely unaware because the game doesn’t tell you the numbers on them (when they did in Sm4sh???)
LikeLike